Welcome to The Few Good Men

Thanks for visiting our club and having a look around, there is a lot to see. Why not consider becoming a member?

19th Panzer Division updates from the front - Day 1 dawn (NO SOVIET PLAYERS ALLOWED)

O

Odin

Guest
First things first, if you're a Soviet player please remove yourself from this thread... go on shoo!

Now for the rest of the wider FGM community; in case you haven't read the other threads this is the first Axis thread detailing the battles taking place during the first turn of multiplayer Radzymin campaign devised by Ithikial (gamesmaster) and myself. The campaign is a semi-historical recreation of the Battle of Radzymin which took place during early August 1944 near Warsaw. Radzymin saw the Germans temporarily halt the Soviet's advance after they had steam-rolled through Army Group Centre during the previous month and half or so.

We are using Pete Wenmann's huge 'Radzymin' CM scenario map to play out the campaign but because the map is so large, the campaign will be played out using smaller maps made from sections of the master map. There are five turns for each 'campaign' day and up to six encounters can take place during each turn. For one side to win they must take and hold the other's logistics hub.

I am commanding the Axis forces, with @Dutch Grenadier and @DasTiger under my command, and we will have 65,000 points to spend over the course of three 'campaign days'. We have decided to play the campaign using an OOB close to what we think the 19th Panzer Division would be operating with in August 44.

For the first day the Germans will be defending with the Soviets enjoying a large points advantage. But as you'll see we have a reasonable defensive line with our troops holding the west bank of the river Struga which the Soviets must cross.


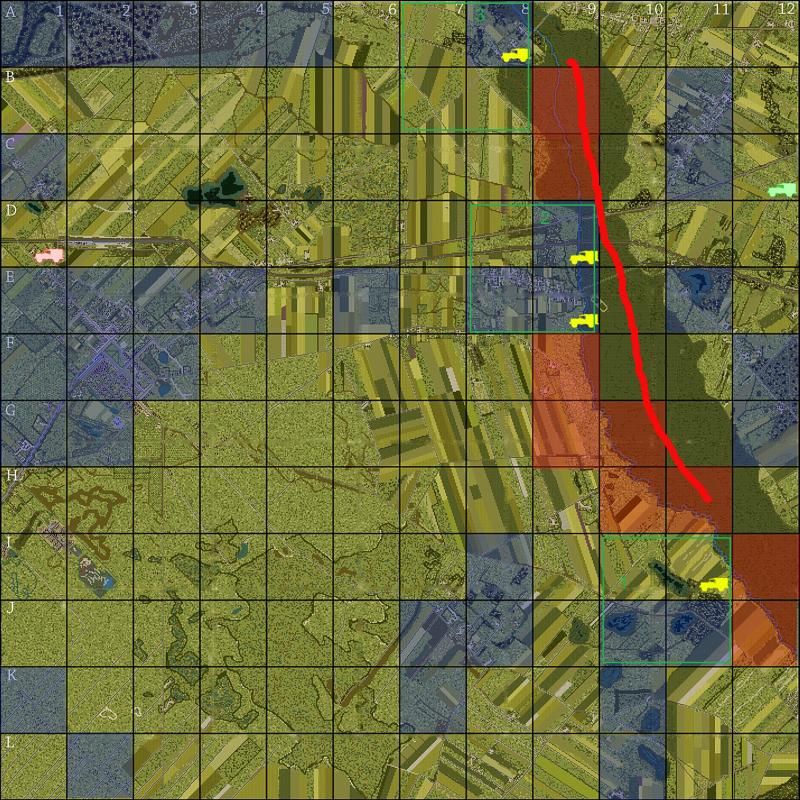
Here's an overview of the master map which is about 5.5km x 5.5.km. The Germans hold the territory to the left of the river. Yellow trucks indicate crossing points. The other trucks are each side's respective logistics hub. Blue squares indicates 'blocking terrain' eg woods or urban areas which troops can be hidden in. Red squares show sections of the river which can't be crossed.

Enjoy!
 
Last edited by a moderator:
Thought you might like to see the brief Ithikial set for the German command:


1700 hours, August 1st 1944

General der Panzertruppe Dietrich von Saucken

XXXIX PanzerKorps Headquarters, Warsaw


To the General Staff,

It is with great heart I inform you that our ad-hoc collection of units, formerly known as Kampfgruppe Von Saucken will be as of tomorrow renamed XXXIX PanzerKorps, with the addition of the 4 Panzer and 5 SS Panzer Divisions to bolster our forces in the defense of Warsaw. Our armoured might is some of the strongest concentration of tanks available anywhere on the eastern front at this time.


Our orders are clear, hold the line outside Warsaw on the east side of the Vistula River, from Radzymin in the north to Wolomin and Okuniew in the south. We expect another Soviet offensive in this area within 24 hours as they continue to push for Warsaw. Our area of operations is the most direct route into the city.


Given our comparative strength in armour we are to blunt any Soviet approach and go on a limited tactical offensive to push Soviet forces back. Doing so will keep the transport and logistical hub of Warsaw out of range of long range artillery fire, giving us more time organise a better line of defence following the disaster in June.


Select the men you want to man the perimeter for tomorrow and pray for there return. It will not be an easy fight; it will not guarantee wider victory, but we will make ready to do our part for the Fatherland.

++++

Weather Forecast – August 2nd 1944 – Hot and dry, followed by a cool change in the evening.

Luftwaffe Readiness – Scattered and smashed squadrons from earlier operations have been channeled to the defense of Warsaw and an adhoc force collection of machines have been assigned to the PanzerKorps for close support duties. They are based west of Warsaw so are current based at secure facilities, however as you can appreciate our air cover is hardly the force it used to be. It is unlikely that they will be able to maintain air superiority.
 
Last edited by a moderator:
I'm going to post some of the highlights from the German OKW's plans, which have been taking place on a separate hidden thread. Once these have been posted, we'll start posting updates from our first round of battles which units are currently being deployed for:

I hope this first post will go some way to explaining our defensive line. which is initially going to be based around holding the west bank of the river. With there being over seven or so crossings over a 5km stretch of river we decided to split our command into three Kampfgruppe, with each kampfgruppe holding one sector. Dutch Grenadier is tasked with the north, me the centre, and DasTiger the south. Here's the highlights from two posts explaining these sectors:

Bad news I'm afraid regarding the crossing points. There are actually seven rather than four points which can be crossed.


Here's an overview of our initial defensive area with some points


Based on the above it may be worth considering cutting the allocation of units positioned in the north sector and bolstering the centre? I think the north sector's crossing point may also be a good location to lay lots of mines. Does anyone know if satchel charges can blow up bridges by the way?

North sector


Centre sector


South sector


BTW this shot only shows one half the master map. There is another 'west wing' as big as this section (unfortunately no cpu can load the entire master map!). Essentially this screen shot shows the map east of square 7 on the campaign overview map and north of K
 
Last edited by a moderator:
As we are limited to 20,000 to spend on units (plus 2,500 on fortification) for the first day of battle, and against a Soviet force of 35,000, The Germans are going to be fighting a defensive battle on day 1 of the campaign. We spent these points on purchasing a number of regiments and battalions which served with 19th Panzer Division. We also bought an additional company of marders (premise explained below). Due to the rules all of these purchases had to be made on 'typical' settings which basically means we have an OOB which averages out as regulars. As the 19th PzDiv had just returned from a refit at the time of Radzymin, most of the units are purchased with full headcounts.

We will have another 45,000 worth of points to spend on day 2 and 3 and these will be used to bring more grenadiers, artilery, and one of the division's panzer regiments to the battlefield.

In summary we have the following OOB for day 1:

Panzer Jager Abt 19
2 companies (21x Jadgpanzer IV)
1 company (9x motorised 75mm PAK)
1 platoon SP 20mm Flak (3x 8t Flakveiring)


Panzer Jager Abt 616*
1 company (13x Marder IIIM)

Heeres Flak Abt 272
4 platoon 88mm Flak (8x Flak36)
2 platoon 20mm Flak (6x Flak38)
1 platoon SP 20mm Flak (4x 8t Flakveiring)
2 platoon SP 20mm Flak (4x SdkFz 10/5)


Panzer Grenadier Regiment 73
1 Battalion armoured grenadier (dismounted)**
1 Battalion motorised grenadier (dismounted)***
1 Motorised Pioneer Company (each platoon equipped with flamethrower) (mounted)
1 75mm infantry gun battery [off-map] (6x 75mm inf. guns split into 3 sections)
1 150mm SP hummel battery (6x hummel)
4 Forward observers****
3 supply platoons (12x Opel Blitz)


* PzJgAbt 616 was a real unit serving with Army Group Centre during Operation Bagration. Abt 616 was equipped with Marder III. I have stripped it down to 1 company of 13 SPG, under the premise that it would have suffered heavy losses during the preceding couple of months. For the purposes of Radzymin it has been placed under 19PzDiv's command. I wanted to include the unit because without it we would only be able to maintain a very limited armoured reserve, and I think we would be in danger of being quickly overwhelmed if the Soviet team brings large amounts of armour to battlefield.

** All vehicles have been removed except for 6x stummels (2 stummels attached to each of the 1st battlaion's rifle companies), and trucskc for the second battalion's 81mm mortar teams. 120mm off-map mortars are selected, and the 4 Company's canon platoon (which contained 6 more stummels) has been deleted and replaced with a battery of off-map 75mm infantry guns (split into 3 sections).

*** All vehilces have been removed. 120mm off-map mortars have been selected, and the battalions AT company removed (sorry needs must:() as ATG support will be provided by PzJgAbt19.

**** The FO's have been attached to various companies in PzGrRg73. The idea being that we each get a team, with one held in reserve. Likewise I have included 3 supply platoons of Opel Blitz - one for each player's Kampfgruppe.


Regarding fortifications we made the following purchases:

Das Tiger
10x trench 200pts
14x foxholes 70pts
9x TRPs 270pts

Odin
20x foxholes 100pts
6x Anti-vehicle mines 150pts
8x Anti-personnel mines 120pts
3x barbed wire 30pts
3x hedgehog obstacles 120pts
8x TRPs 240pts

TOTAL 1300pts

That leaves 1200pts for Dutch Grenadier to spend on the Northern Sector.

This is what our 20,000 points look like :)

 
Last edited by a moderator:
Dutch Grenadier, DasTiger and myself had some fairly lengthy discussions about our defensive setup. Here are some highlights:

1. Dutch Grenadier post

gave the map a look and these 3 sectors are the first places we need to hold.

We should think on how we would like to defend these 3 sectors:
We should devide our bunkers, trenches, mines ect. We should think on how to deploy artillery. It is fital that we hold the river crossings. We should focus on the defence for those crossings.
1:
2:
3:


2. Odin post

Overall strategy
Unless someone can come up with a compelling plan to suggest otherwise, I think we should aim to hold a defensive line on the first day of battle along our side of the river, and as Dutch Grenadier identified earlier I think it'd be wise to focus our resources around the 4 crossing points. Given the Soviet's initial 2 : 3.5 points advantage I expect them to attack strongly on the first day of battle. Therefore, the aim for day 1 is to hold our defensive positions and inflict as heavy losses as possible on the Soviets, softening them up for a panzer led counterattack on days 2 and 3.

We will be split into 3 kampfgruppe (each of us commanding a group) and a reserve which I'll deploy as and when required. To start with the Kampgruppes will be based around sectors - north, centre, and south. If the Soviets manage to form a bridgehead and break our defensive line early on, we will have to be flexible our management of the kampfgruppe, with perhaps less emphasis placed on geographical locations and more on mobility.

Regarding the resources placed under each of Kampfgruppe's command I'd like to suggest the following:

1x platoon JdpzIV
1x platoon Marder
1x platoon 75mmPAK
1x company armoured grenadier [dismounted]
1x company motorised grenadier [dismounted] (with the possible exception of the southern sector kampfgruppe which due to its open terrain will probably only receive 1 company of grenadiers.
1x platoon of 20mm flak
1x section 75mm infantry gun (off-map artillery)
1-2x section 120mm mortar (off-map artillery)
1x Forward observer

Reserve will be split into two parts:

1. Mobile reserve
3x platoon JdpzIV
1x motorised pioneer company [mounted]
1x grenadier company (10 JdpzrIV will provide enough transport to mount a grenadier company)
1x platoon SP Flak
1-2x section 120mm mortar (off-map artillery)
1x 150mm Hummel Battery (off-map artillery)
1x 88mm Flak Battery (off-map artillery)
1x Forward observer team

2. Static Flak reserve
2x battery of 88mm Flak (which can also be called in to provide off-map artillery support).


The mobile reserve can either be deployed in its entirety and/or atached to one of the Kampfgruppe. Alternatively commanders can apply to borrow parts of the mobile reserve to fight individual encounters - eg the enemy only declares one attack during a turn leading us to believe they will commit a significant proportion of their resources to the encounter.

Although I will try to avoid pulling units out of one kampfgruppe to be utilised by another; please note circumstances may dictate this on occasion.

The static battery of 88mm Flak36 will be positioned around our logistics hub (the train station). Positioned there, it is designed to act as a last ditch AT reserve in case of an enemy break through and offer off-map artillery support to the Kampfgruppen.


Tactics
As Kampfgruppe commanders I'll leave tactics for the individual encounters to each commander's own discretion. I would only ask the following:
1. Withdrawal zones will be provided for each encounter, therefore if you find yourself fighting a battle which is lost and you can only hope to suffer far greater casualties than the enemy will, in most circumstances I would prefer you to withdraw your surviving units from the field (if possible) rather than fight to the last man.

Another couple of tactical considerations:
1. The scenario maps for Radzymin will potentially be quite large at over 2km x 2km. I don't know how you've both found playing RT, but from my own experiences the Germans are the superior side fighting at long ranges. In particular BF seemed to have modelled the German's superior tank optics into the game, and in one-on-one encouters at over 700m-800m German armour usually comes out on top, as do German HMGs against Russian infantry.
3. Soviet SMG laden infantry kicks the German infantry's arses when fighting at close range - so maybe close encounter infantry actions are best avoided where possible.

3. Das Tiger response

We will never know where he will attack in force until the battle starts. It all comes down to trying to guess what he will do. If it were me I would attack heavy in the North. With his knowledge of the accuracy of German AT guns he would be a fool to try and cross the open areas with his armor. If I were him this is what I would do.
1. Pre planned arty along the whole front with the intent of taking out as many AT guns as possible.
2. Smoke shells after the Arty is done.
3. Mobile infantry/light armor advancing across the whole front.
4. A strong reserve in the middle.
5. A heavy armor trust on the North.
6. If my attack on the North works than I would commit my reserves there.
7. If the North stalls I look for second crossing points based off of advances my mobile infantry/light armor were able to make.

I like your idea of going soft in the middle and then hitting him from the flanks. What about this... @Dutch Grenadier takes the North with the option of blowing the bridges with satchel charges (I would assume this would work but I know for a fact that Arty will blow a strong bridge eventually) And then we hold our reserves in or near the center as you suggest.

Here is what I would see us do.
1. AT guns across the front.
2. Armour in reserve close to the front in the North. With the intent of joining the battle quick if he does commit there.
3. Mobile armour reserve in the south.
4. Main reserve in the center.
5. If he does commit in the North, I would like for us to be able to come in from the south and hit him in the flank and rear hard with a strong armor force.
 
We finally settled on the following defensive setup (this campaign map overview shows our the deployment of our forces at the end of movement phase of turn 1 awaiting our first encounters. The unit counters detail the type and size of unit deployed. Those counters containing an infantrymen are company size. The vehicle and AT gun counters are platoon size (eg made up of 4-5 SPGs).

Campaignmapsectorcommandturn1edit.jpg


I have placed parts of the map under cross-command. EG if the northern sector was attacked and the centre wasn't then Kampfgruppe DG could potentially take command of the Marder platoon and a grenadier company in positioned in square D9 which ais nominally under Kampgruppe Odin's command. Likewise if the Centre sector was attacked but Northern wasn't, then Kampfgruppe Odin could commandeer the JdPzIV platoon in square C8.

This is also the same case for the southern and centre sectors with the JdPzIV platoon in G9 and the AT gun and Marder platoons in F8 and F9. If all three sectors are attacked in one turn we would have to split these "cross-command" units depending on how the battle maps are drawn up (4x4 being the largest an attacker can declare, although we have the option to extend to 5x5).

Those units contained within a sector's shaded colour box are nominally part of the Kampfgruppe defending that sector. Units not within a 'cross-over' area are to be deployed as their sector commander wishes. Although please note, if we are to go with the above method those units in 'cross-over' squares should remain in a part of the map so that both commanders could potentially commandeer them. EG the JdpzIV platoon, in C8, under Kamfgruppe DG's command, should be positioned in one of C7, C8, C9, D7,D8, or D9 so both Odin and Dutch Grenadier could potentially have access to it.
 
I really hope no Russian players reads this...???...
 
I've been told the Soviets are going to be making their own thread so the situation could be likened to MAD. Ultimately if someone wants to cheat they only need load a map up on the scenario editor. People on FGM seem to be a decent bunch so lets hope honesty wins out.
 
I hope so mate... Our entire strategic plan is out there incl our units
 
@Dutch Grenadier Strachwitz has assured me he won't be looking, I take him at his word. He's also going to be producing an AAR thread for the Soviets.
 
Since we have the cheating thing solved (I hope we do... And yes the FGM group is a bunch of good people so it shouldn't be an issue) then I will post my screenshots here? Unless there are any objections?

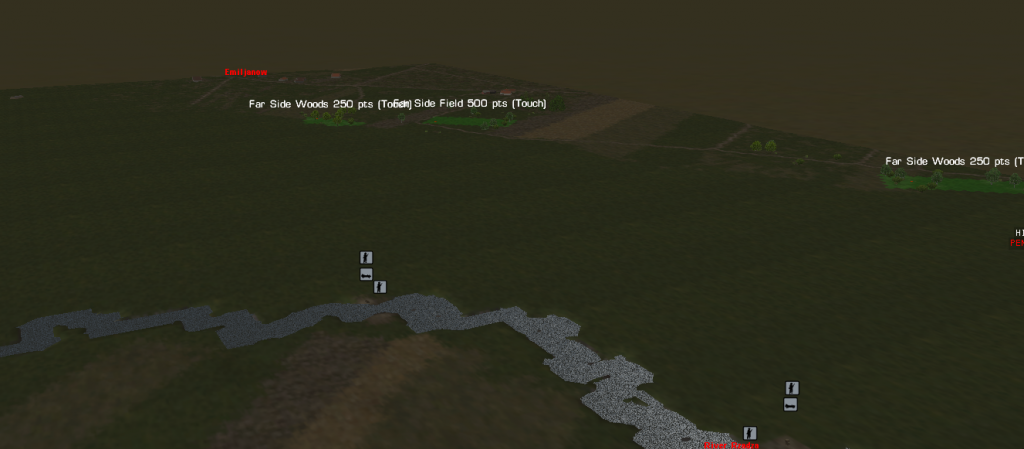
The first shot is of my setup. As you can see I have only two squads forward with two Kubels and everyone else is well hidden in the woods and behind a slight rise.


Looking acoss to his side. I have 3 touch objectives. I will send scout teams in the two Kubels towards te center one for 500 pts and the far right one for 250 pts.


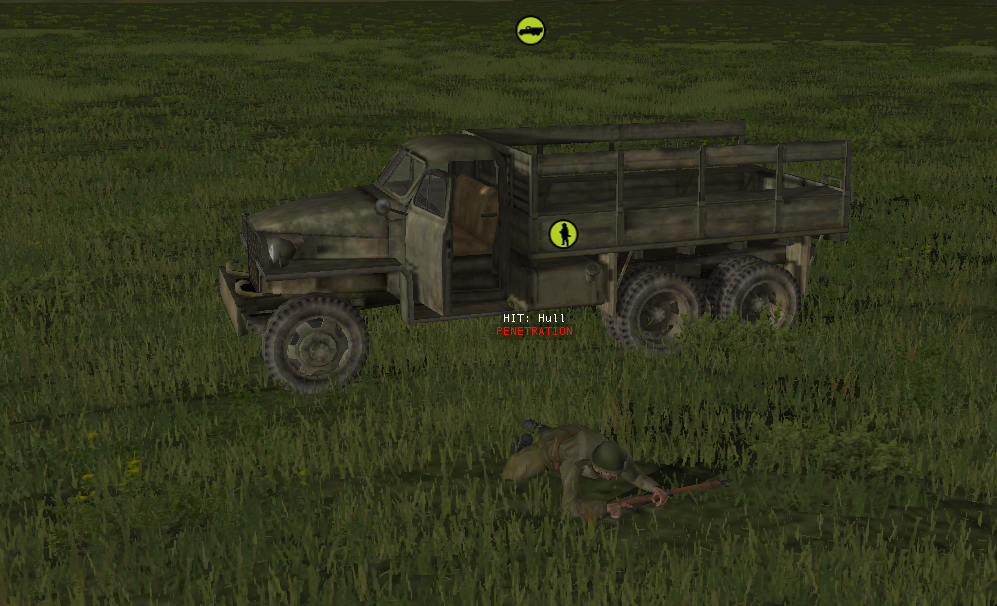
As the turn starts I see a lonely truck out in the middle of the field. My two forward squads open up with their MG42's and rake the thing with bullets. The driver bails.


At least he knows I here!
 
Good work Das, first blood to the Wehrmacht ;). Looks like the Soviets might be trying to carry out a little recon of their own.

I guess this would b a good point to update what is taking place during the first turn. Das Tiger, Dutch Grenadier and myself all have encounters to play out. Das and Dutch have reconnaissance missions. Their objectives being to each make contact with three touch objectives on the maps drawn up by Itikial. Das Tiger will recce enemy positions across the river in front of the southern sector defences he commands. Dutch will be doing the same in the northern sector. Should they successfully complete these missions enemy intel will be revealed by Ithikial.

I on the other hand will be defending a large Soviet attack which is concentrating on the village of Dybrow in the centre sector. I'm currently deploying my defences. Once this is complete and I start the battle I'll post some updates.

The next screen shot shows DasTiger's recon area in the southern area of campaign map. If you take a look at Das's screen shorts you'll notice he is scouting the area to the right of the river with a corner of his positions in the woods to the left of the river being his starting point.

 
Last edited by a moderator:
Just waiting for the Soviets to open their thread before anything else goes up. Call it MAD on a miniaturised geeky scale.

I will say my battle has kicked off and all hell is breaking out. Should make for some good updates.
 
Ok then, I think we can safely say from the discussion which took place on the other thread that the Soviets won't be looking at this thread until the campaign is over. I'm happy to post operational updates, as well as updates from my battles mid-scenario and campaign. @DasTiger @Dutch Grenadier I'll leave it to your discretion as to whether or not you want to post updates concerning your battles whilst they're in progress.

So the story so far for the movement phase of turn 1. The map below shows the position of our units as well as those of the enemy's which are visible at the end of the first movement phase for turn 1. The central area I am commanding is subject to a Soviet attack. Dutch Grenadier and Das Tiger are both conducting reconnaissance missions across the river from their positions. DG's battlefield is marked off as the rectangular area at the top of the map. DT's is marked by the green rectangle at the bottom. Mine is marked out by the dark blue rectangle (minus the four squares running along row F).

AxisDawnresponse.jpg
 
The details below shows the reinforcements and off-map artillery support I requested for my battle, which is going to try and repel a Soviet assault across the river. The map shows where they are to be deployed.

Reinforcements:

- FlakPl / PzJgBt.19
- 1.Cp / PzJgBt.19
- 2.Pl / 2.Cp / PzJgBt.19
- One of the forward observers to be attached to the infantry company in the central sector without an FO, currently stationed with KgDG in the northern sector (will The FO be there at the start of the battle?).

(I'll leave Viking's infantry company in position to add fortification's to their campaign square).

I would like to allocate the following off-map artillery to the central sector:

- 1 Battery (88mm flak) HrFkAbt.272
- 1 Battery (150mm hummel) PzGr.73
- 1 Section, 2 Battery (75mm leIG18) PzGr.73
- 1 Section, 4 Company, 1 Battalion (120mm mortar) PzGr.73


The screen shot below shows my terrain objective (black crosses) and where I'd like the reinforcements to enter the battlefield (red crosses).


http://s96.photobucket.com/user/his...reinforcementsandobjectives_edited-2.jpg.html
With that Ithikial drew up our battlefields. As it turns out I am up against Strachwitz for my battle. As the Soviets are only attacking the central sector we expected them to throw a lot of resources into the battle. My plan is to smash their attack with my artillery and then counter attack with the armoured reinforcements. I need to make great efforts to prevent the Soviets forming a bridgehead and push them back across the river if needs be. If worst comes to worst and I can't repel Strachwitz I'll pull back using the exit zones - but hopefully it won't come to that.
 
My battle with Strachwitz is underway. The shots below show my deployment:


I have two companies of infantry in the centre, pulled back sightly from parts of the village and woodlands closest to the river - as I think they'll receive a hammering from Soviet barrages if positioned too close to the crossing. Positioned to the left I have a platoon of JdpzIVs. Two of the JdpzIVs are positioned further forward. They will have LOS on the flanks of any enemy tanks attempting to move across the bridges to the left. There are two JdpzIVs further back, currently hidden in a ditch, which will be used engage in some long range duels if needs be. I also have three AT guns to the left which I'd like to remain hidden until enemy armour attempts to take the bridges. These are supported by a platoon of 4 marders.


I have reinforcement armour on the way, but I think if I'm to stop the Soviets my arty is going to be crucial - as I'm hoping I'll be able to cut Russian infantry up attempting to move across the open plains which are dotted with TRPs.
 
Back
Top