
A
Artemis258
Guest
Well, after the spectacularly bloody showdown between myself and Gnarly, I've taken on a new opponent. It's the Ruskis vs the Ukranians again but with a twist.... I'm the Ukranian!
This battle was set up by my opponent Spitfire, and it looks like an interesting one... the map looks good, but before we get into all that analysis boredom, let's go shopping!
THE LIST
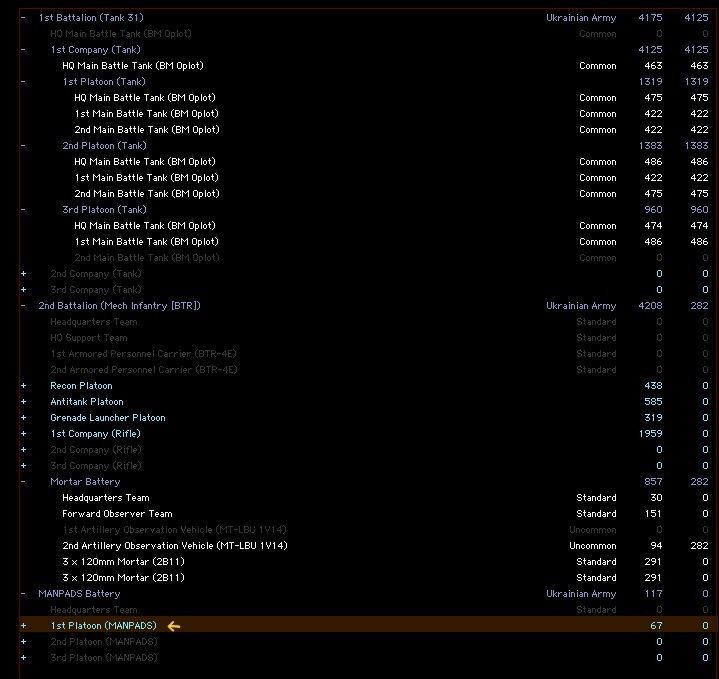
With a very decent amount of points to spend, I got to have some fun with this. A company of tanks AND a company of infantry? yes please!
With a few hundred still left over, I could even tweak a bit. Dropping a tank from the company bulked up my play money a bit. One tank here won't make much difference, and gives me three units of 3 to play with. With these extra points, I could outfit each platoon with their own corsair-toting crazyman. Having played the Ukranians before, I know the power these little dudes can bring to the battlefield. They're the only eastern shoulder-fired ATGM, giving them a much better mobility and smaller signature than their tripod-mounted brothers.
I also took a half-platoon of MANPADS. I don't like air support in these games terribly much - I find it unreliable in all but the biggest of battles, and expensive. That said 5 dudebros with iglas will give me a bit of a buffer against anything Spitty brings against me there.
I also kept the inf. Battalion's grenade launchers, recon teams and antitank platoons. All indispensable.
This has forced some cutbacks. My guys ride into battle in BTR's not BMPs, and only two of them are the modern shiny 4E's. My rationale here is that the BMPs, while a capable fighting vehicle, don't bring to the battle the same punch as an Oblot. I wish I'd had just enough points to mount them in at least the modern ones with the RWS (Which I ADORE!), however I got greedy with other things. So that's that.
Finally, I've got the 6 tubes of 120mm mortars from Battalion. These dudebros are off-map. Lazy sods.
With the remaining points (a few hundred) I specced up most of my tanks to Veteren level, my company and platoon atgm's to Vet or above, and my battalion AT assets to crack!
anything left over specced up the footsloggers, starting with arty observers then moving down the chain of command.
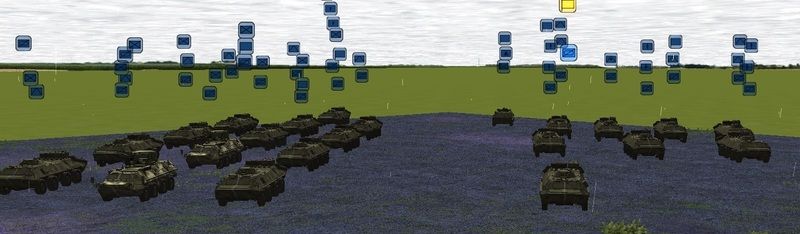
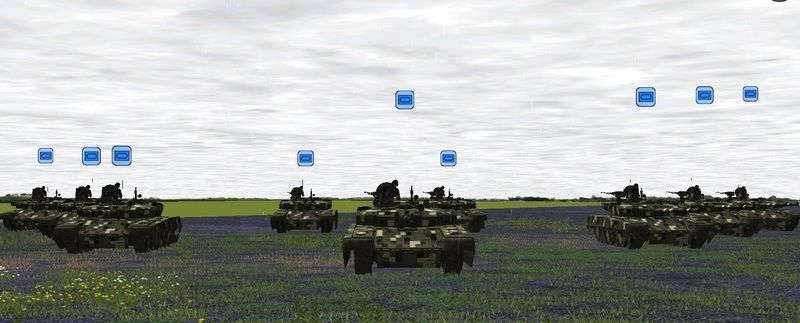
Some group photos! In case you're wondering about the units, I use Kieme's excellent retextures for all my units! They can be found HERE http://community.battlefront.com/topic/117795-kiemes-modding-corner/?do=findComment&comment=1620919
This battle was set up by my opponent Spitfire, and it looks like an interesting one... the map looks good, but before we get into all that analysis boredom, let's go shopping!
THE LIST

With a very decent amount of points to spend, I got to have some fun with this. A company of tanks AND a company of infantry? yes please!
With a few hundred still left over, I could even tweak a bit. Dropping a tank from the company bulked up my play money a bit. One tank here won't make much difference, and gives me three units of 3 to play with. With these extra points, I could outfit each platoon with their own corsair-toting crazyman. Having played the Ukranians before, I know the power these little dudes can bring to the battlefield. They're the only eastern shoulder-fired ATGM, giving them a much better mobility and smaller signature than their tripod-mounted brothers.
I also took a half-platoon of MANPADS. I don't like air support in these games terribly much - I find it unreliable in all but the biggest of battles, and expensive. That said 5 dudebros with iglas will give me a bit of a buffer against anything Spitty brings against me there.
I also kept the inf. Battalion's grenade launchers, recon teams and antitank platoons. All indispensable.
This has forced some cutbacks. My guys ride into battle in BTR's not BMPs, and only two of them are the modern shiny 4E's. My rationale here is that the BMPs, while a capable fighting vehicle, don't bring to the battle the same punch as an Oblot. I wish I'd had just enough points to mount them in at least the modern ones with the RWS (Which I ADORE!), however I got greedy with other things. So that's that.
Finally, I've got the 6 tubes of 120mm mortars from Battalion. These dudebros are off-map. Lazy sods.
With the remaining points (a few hundred) I specced up most of my tanks to Veteren level, my company and platoon atgm's to Vet or above, and my battalion AT assets to crack!
anything left over specced up the footsloggers, starting with arty observers then moving down the chain of command.
Some group photos! In case you're wondering about the units, I use Kieme's excellent retextures for all my units! They can be found HERE http://community.battlefront.com/topic/117795-kiemes-modding-corner/?do=findComment&comment=1620919


 Hoping this game isn't dead.