


This is the first of a series of after-action reports about the single-player version of my scenario Gruppe Bohm to Le Rocher. It begins with an historical description and continues with a series of screen grabs covering the first five minutes of the start of the advance.
Battle Report, CMBN single-player scenario: Gruppe Böhm to Le Rocher
This scenario re-enacts the attack by one of the four arms of Panzer Lehr’s attack against the American 30th Infantry Division during the night of 11 July 1944.
The following excellent summary of events, slightly edited by me, is quoted from www.flamesofwar.com/Default.aspx?tabid=112&art_id=514&kb_cat_id=35
The US Advance on St-Lô
The town of St-Lô was an important communications and transportation hub in Normandy and as such became an important objective for US forces ...
…By 18 June they were in striking distance of St-Lô. The arrival of the 30th Infantry Division gave a welcome respite for the 29th Infantry Division who had been fighting since D-Day and had suffered over 2,400 casualties during the fighting thus far, though they remained in the line and continued to push forward.
The Germans, however, were relying on the exhausted Kampfgruppen of the 352. Infanteriedivision to hold off the US advance, many of which were on the point of breaking. The 3. Fallschirmjägerdivision and 353. Infanteriedivision had been rushed in to reinforce the front, but were … not yet fully deployed.
Further reinforcements arrived in the sector to support the 352. Infanteriedivision on 25 June in the form of Kampfgruppe Kentner from the 266. Infanteriedivision. By the end of the month elements of the 343. Infanteriedivision were also in the area.
… On 7 July the 117th and 119th Infantry Regiments of the 30th Infantry Division had crossed the Vire at Ponte de St-Fromond and advanced west beyond St-Fromond-Eglise.
… During this time the US VII Corps entered the battle east of the Taute River with the 9th Infantry Division. By 10 July the division had crossed the Taute-Vire canal and had its west flank fanned out towards the Taute. By the end of the day, they had advanced the 60th Infantry Regiment as far as Graignes in the west. The 47th Infantry Regiment reached Bois du Hommet and the 39th Infantry Regiment finally entered le Désert in the evening. Unfortunately, the 39th Infantry Regiment’s slow advance meant they lost contact with the 47th …to the west leaving a 1600 metre gap between the two … covered by a single company from the 39th’s 3rd battalion.
The Counter-attack 11 July 1944
On 10 July the Panzer Lehr Division took over the sector of Kampfgruppe Heintz (275. Infanteriedivision) west of the Vire. It had about 100 operational Panzers …
It was agreed that 901. Panzergrenadier Regiment and thirty Panther tanks of the 6. Panzer Regiment would advance from le Hommet-d’Arthenay towards St-Jean-de-Daye. Meanwhile further east another Kampfgruppe consisting of the 902. Panzergrenadier Regiment, and Panzer IV tanks would attack from Pont-Hébert to St-Fromond. To minimise the effect of Allied air superiority the attack would begin at night. The aim was to destroy the Vire bridgehead south of the Vire-Taute canal and therefore eliminate the most direct and immediate threat to St-Lô.
Each of these two Kampfgruppen were in turn divided into two Battalion groups:
Kampfgruppe West
I Bataillon/901
Kampfgruppe Ost
I Bataillon/902
The Western Attack
901. Panzergrenadier Regiment Kampfgruppe launched its attack … at 0145 hours on 11 July. The II Battalion/901 Group split off and turned north … towards la Charlemagnerie and la Caplainerie and the positions of the I Battalion, 47th Infantry Regiment, … 9th Infantry Division. The (rest of the) assault Group continued … towards le Désert and the positions of the 39th Infantry Regiment.
The I Battalion/901 Group easily broke through the surprised 39th Infantry Regiment. German troops also broke through the … gap between to two US regiments, allowing the … Panzergrenadiers to over run the command of the III Battalion, 47th Infantry Regiment. Pushing beyond le Désert two Panthers (were) destroyed crossing the dam … near the village. Once the second tank had been knocked out it became impossible to cross.
Meanwhile II Battalion/901 Group had reached la Caplainerie by 0245 hours and the (undefended) crossroads … They then probed north and discovered a blocking position defended by four M10 Tank Destroyers of the 899th Tank Destroyer Battalion. The column decided to outflank the position by turning northeast at the crossroads ...
The advance was stalled at la Sellerie 2km further northeast... Here they ran into more M10s of the 899th … Both sides fired at each other’s muzzle flashes in the darkness. By daylight the Germans realised their exposed position. After a US air strike destroyed three (more) Panthers they decided to retire back to the crossroads near la Caplainerie.
The II Battalion/901 Group then renewed its thrust northward through la Caplainerie along the road towards le Mesnil-Véneron. The lead Panther, heavily camouflaged with leaves and branches, soon came upon the US tank destroyers. The M10s opened fire, initially hitting with an HE round, before firing a second AP round and knocking out the … German tank. This stalled the move north yet again.
By the afternoon substantial … US reinforcements were converging on … Panzer Lehr’s attack.
Other elements of the 9th Infantry Division were directed to the III Battalion, 47th Infantry Regiment’s positions (along) with additional units from the 3rd Armored Division and 899th Tank Destroyer ...
Heavy fighting continued in the afternoon and the Panther company attached to the II Batttalion/901 Group of the 901. Panzergrenadier Regiment Kampfgruppe was soon engaged in a deadly fire fight with the M10s at the blocking position as well as … bazooka … (teams from) … the I Battalion, 47th Infantry ... During the fighting the Panthers were also attacked by US aircraft and a number of Panthers were lost. Finally forced to retire the crews got two Panthers stuck in roadside drainage ditches and were forced to abandon them. By the end of the engagement all eight of the Panthers to engage the position were lost.
By 2100 hours the 9th Infantry Division were able to occupy the positions they had held at the start of the German attack.
The Eastern Attack
To the southeast the 902. Panzergrenadier Regiment and the II Battalion, 130. Panzer Regiment were also (attacking) … towards the Vire Bridgehead. This sector was defended by the 119th Infantry Regiment, 30th Infantry Division who like the 9th Infantry Division were freshly arrived in Normandy.
The attack … thrust up the riverside road towards Cavigny. It was heavily supported by artillery fire and by 0930 hours it had reached la Coquerie. As the attack continued north it was countered by the III Battalion, 119th Infantry Regiment supported by Task Force Y (3rd Armored Division) and 823rd Tank Destroyer Battalion. M10s halted the attack at Bahais. Task Force Y then moved down the river road towards the German’s starting position only to come under fire from the opposite bank of the Vire. German self-propelled guns knocked out six Shermans. Task Force Y then swung towards la Coquerie to attack the 902. Panzergrenadiers left flank. The kampfgruppe was forced to retreat back to its starting positions by 1500 hours where they set-up defensive positions at Pont-Hébert.
The II Battalion/902 Group meanwhile had thrust towards le Rocher from les Hauts Vents. (This is the situation that my CMBN scenario recreates). The leading Panzer IV ran into strong resistance (just beyond) the high ground around les Hauts Vents. Several Panzer IV tanks were lost to bazooka fire (as they approached le Rocher) and the Germans were forced to retreat.
Later in the day the Task force Z (3rd Armored Division) counter-attacked towards les Hauts Vents.
At the end of the day the Panzer Lehr Division had gained some ground, but had been forced to give it up due to mounting casualties. They had lost over 700 men and some 30 tanks trying to breakthrough to the Vire Bridgehead. They soon realised the US forces were far too numerous to breakthrough with just a single under-strength division. The 9th Infantry Division’s presence in the area had been unknown to the Germans who had been expecting to face just the 30th Infantry Division.
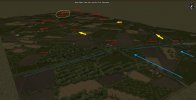
THE MAP
The three blue and single red arrows show Lehr's axes of advance. The yellow rectangle shows the extent of the scenario map and the red arrow is the advance of the units in this scenario.
THE SCREEN GRABS
Lehr001: This is the scenario map. The objective, 'Le Rocher' is circled in yellow. The dotted blue line is the initial German front line with the red farm buildings of Les Hauts Vents in the centre. The yellow arrows are the main highway and dirt secondary road over which this arm advanced. Mods used in this image include Aris' terrain, Falaise 22.5 degree roads, Kandu's (Wim) Hauts Vents buildings, TaL's and Kiemes's buildings, Juju's walls and semi-transparent trees by ??,
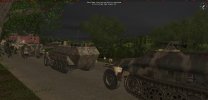
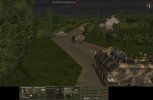
Lehr002a: Lehr was completely motorized. The number of vehicles stretches back more than a kilometre and it takes quite some time to get the whole column moving. The lead vehicles begin the scenario at Les Hautes Vents. This screen grab is with artificial light turned on. The vehicle skins are mods by Aris and Umlaut with Lehr's 'L' divisional marking added by (me) Kandu.
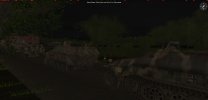
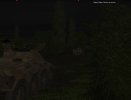
Lehr002b: This is the same image as 002a but with realistic night lighting. Very dark!
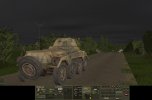
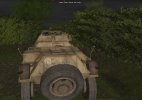
Lehr003: The lead recon armoured car just north of Les Hauts Vent but still on the height overlooking the valley between the German and American positions.
Lehr004: The vehicles move forward at slow speed and well spaced down the main highway. Special scenario rules restrict the player to moving vehicles slowly until a burning building or vehicle lights the road section being travelled. This was necessary to recreate the historical situation of a pitch black night and roads bordered by tall bocage severely restricting visibility and the necessity of accompanying infantry to protect the vehicles. Moving faster is possible to players with their God-like view but not to the combatants at the time.
Lehr005a: The lead recon armoured car moving cautiously down the dirt lane on the right flank. Note the 'L' tactical identifier. Image with artificial lighting.
Lehr005b: The same as 005a above but with true night lighting.
At this point the lead armoured car on the highway is just beginning to climb the road up the ridge to which the Americans had fallen back after their first (failed) attempt to capture the Les Hauts Vents farm complex.
Battle Report, CMBN single-player scenario: Gruppe Böhm to Le Rocher
This scenario re-enacts the attack by one of the four arms of Panzer Lehr’s attack against the American 30th Infantry Division during the night of 11 July 1944.
The following excellent summary of events, slightly edited by me, is quoted from www.flamesofwar.com/Default.aspx?tabid=112&art_id=514&kb_cat_id=35
The US Advance on St-Lô
The town of St-Lô was an important communications and transportation hub in Normandy and as such became an important objective for US forces ...
…By 18 June they were in striking distance of St-Lô. The arrival of the 30th Infantry Division gave a welcome respite for the 29th Infantry Division who had been fighting since D-Day and had suffered over 2,400 casualties during the fighting thus far, though they remained in the line and continued to push forward.
The Germans, however, were relying on the exhausted Kampfgruppen of the 352. Infanteriedivision to hold off the US advance, many of which were on the point of breaking. The 3. Fallschirmjägerdivision and 353. Infanteriedivision had been rushed in to reinforce the front, but were … not yet fully deployed.
Further reinforcements arrived in the sector to support the 352. Infanteriedivision on 25 June in the form of Kampfgruppe Kentner from the 266. Infanteriedivision. By the end of the month elements of the 343. Infanteriedivision were also in the area.
… On 7 July the 117th and 119th Infantry Regiments of the 30th Infantry Division had crossed the Vire at Ponte de St-Fromond and advanced west beyond St-Fromond-Eglise.
… During this time the US VII Corps entered the battle east of the Taute River with the 9th Infantry Division. By 10 July the division had crossed the Taute-Vire canal and had its west flank fanned out towards the Taute. By the end of the day, they had advanced the 60th Infantry Regiment as far as Graignes in the west. The 47th Infantry Regiment reached Bois du Hommet and the 39th Infantry Regiment finally entered le Désert in the evening. Unfortunately, the 39th Infantry Regiment’s slow advance meant they lost contact with the 47th …to the west leaving a 1600 metre gap between the two … covered by a single company from the 39th’s 3rd battalion.
The Counter-attack 11 July 1944
On 10 July the Panzer Lehr Division took over the sector of Kampfgruppe Heintz (275. Infanteriedivision) west of the Vire. It had about 100 operational Panzers …
It was agreed that 901. Panzergrenadier Regiment and thirty Panther tanks of the 6. Panzer Regiment would advance from le Hommet-d’Arthenay towards St-Jean-de-Daye. Meanwhile further east another Kampfgruppe consisting of the 902. Panzergrenadier Regiment, and Panzer IV tanks would attack from Pont-Hébert to St-Fromond. To minimise the effect of Allied air superiority the attack would begin at night. The aim was to destroy the Vire bridgehead south of the Vire-Taute canal and therefore eliminate the most direct and immediate threat to St-Lô.
Each of these two Kampfgruppen were in turn divided into two Battalion groups:
Kampfgruppe West
I Bataillon/901
- I Bataillon, 901. Panzergrenadier Regiment
- Two Kompanien of 130. Panzerjägerabteilung (Jagdpanzer IV)
- 10 PzKfw V (Panther) from I Bataillon, 6. Panzer Regiment
- II Bataillon, 901. Panzergrenadier Regiment
- Remaining Panther tanks of the I Battailon, 6. Panzer Regiment
Kampfgruppe Ost
I Bataillon/902
- I Bataillon, 902. Panzergrenadier Regiment
- II Bataillon, 130. Panzer Regiment (PzKfw IV)
- II Bataillon, 902. Panzergrenadier Regiment
- 7. Kompanie, II Bataillon, 130. Panzer Regiment (PzKfw IV)
- Panzerpionierkompanie
The Western Attack
901. Panzergrenadier Regiment Kampfgruppe launched its attack … at 0145 hours on 11 July. The II Battalion/901 Group split off and turned north … towards la Charlemagnerie and la Caplainerie and the positions of the I Battalion, 47th Infantry Regiment, … 9th Infantry Division. The (rest of the) assault Group continued … towards le Désert and the positions of the 39th Infantry Regiment.
The I Battalion/901 Group easily broke through the surprised 39th Infantry Regiment. German troops also broke through the … gap between to two US regiments, allowing the … Panzergrenadiers to over run the command of the III Battalion, 47th Infantry Regiment. Pushing beyond le Désert two Panthers (were) destroyed crossing the dam … near the village. Once the second tank had been knocked out it became impossible to cross.
Meanwhile II Battalion/901 Group had reached la Caplainerie by 0245 hours and the (undefended) crossroads … They then probed north and discovered a blocking position defended by four M10 Tank Destroyers of the 899th Tank Destroyer Battalion. The column decided to outflank the position by turning northeast at the crossroads ...
The advance was stalled at la Sellerie 2km further northeast... Here they ran into more M10s of the 899th … Both sides fired at each other’s muzzle flashes in the darkness. By daylight the Germans realised their exposed position. After a US air strike destroyed three (more) Panthers they decided to retire back to the crossroads near la Caplainerie.
The II Battalion/901 Group then renewed its thrust northward through la Caplainerie along the road towards le Mesnil-Véneron. The lead Panther, heavily camouflaged with leaves and branches, soon came upon the US tank destroyers. The M10s opened fire, initially hitting with an HE round, before firing a second AP round and knocking out the … German tank. This stalled the move north yet again.
By the afternoon substantial … US reinforcements were converging on … Panzer Lehr’s attack.
Other elements of the 9th Infantry Division were directed to the III Battalion, 47th Infantry Regiment’s positions (along) with additional units from the 3rd Armored Division and 899th Tank Destroyer ...
Heavy fighting continued in the afternoon and the Panther company attached to the II Batttalion/901 Group of the 901. Panzergrenadier Regiment Kampfgruppe was soon engaged in a deadly fire fight with the M10s at the blocking position as well as … bazooka … (teams from) … the I Battalion, 47th Infantry ... During the fighting the Panthers were also attacked by US aircraft and a number of Panthers were lost. Finally forced to retire the crews got two Panthers stuck in roadside drainage ditches and were forced to abandon them. By the end of the engagement all eight of the Panthers to engage the position were lost.
By 2100 hours the 9th Infantry Division were able to occupy the positions they had held at the start of the German attack.
The Eastern Attack
To the southeast the 902. Panzergrenadier Regiment and the II Battalion, 130. Panzer Regiment were also (attacking) … towards the Vire Bridgehead. This sector was defended by the 119th Infantry Regiment, 30th Infantry Division who like the 9th Infantry Division were freshly arrived in Normandy.
The attack … thrust up the riverside road towards Cavigny. It was heavily supported by artillery fire and by 0930 hours it had reached la Coquerie. As the attack continued north it was countered by the III Battalion, 119th Infantry Regiment supported by Task Force Y (3rd Armored Division) and 823rd Tank Destroyer Battalion. M10s halted the attack at Bahais. Task Force Y then moved down the river road towards the German’s starting position only to come under fire from the opposite bank of the Vire. German self-propelled guns knocked out six Shermans. Task Force Y then swung towards la Coquerie to attack the 902. Panzergrenadiers left flank. The kampfgruppe was forced to retreat back to its starting positions by 1500 hours where they set-up defensive positions at Pont-Hébert.
The II Battalion/902 Group meanwhile had thrust towards le Rocher from les Hauts Vents. (This is the situation that my CMBN scenario recreates). The leading Panzer IV ran into strong resistance (just beyond) the high ground around les Hauts Vents. Several Panzer IV tanks were lost to bazooka fire (as they approached le Rocher) and the Germans were forced to retreat.
Later in the day the Task force Z (3rd Armored Division) counter-attacked towards les Hauts Vents.
At the end of the day the Panzer Lehr Division had gained some ground, but had been forced to give it up due to mounting casualties. They had lost over 700 men and some 30 tanks trying to breakthrough to the Vire Bridgehead. They soon realised the US forces were far too numerous to breakthrough with just a single under-strength division. The 9th Infantry Division’s presence in the area had been unknown to the Germans who had been expecting to face just the 30th Infantry Division.
THE MAP
The three blue and single red arrows show Lehr's axes of advance. The yellow rectangle shows the extent of the scenario map and the red arrow is the advance of the units in this scenario.
THE SCREEN GRABS
Lehr001: This is the scenario map. The objective, 'Le Rocher' is circled in yellow. The dotted blue line is the initial German front line with the red farm buildings of Les Hauts Vents in the centre. The yellow arrows are the main highway and dirt secondary road over which this arm advanced. Mods used in this image include Aris' terrain, Falaise 22.5 degree roads, Kandu's (Wim) Hauts Vents buildings, TaL's and Kiemes's buildings, Juju's walls and semi-transparent trees by ??,
Lehr002a: Lehr was completely motorized. The number of vehicles stretches back more than a kilometre and it takes quite some time to get the whole column moving. The lead vehicles begin the scenario at Les Hautes Vents. This screen grab is with artificial light turned on. The vehicle skins are mods by Aris and Umlaut with Lehr's 'L' divisional marking added by (me) Kandu.
Lehr002b: This is the same image as 002a but with realistic night lighting. Very dark!
Lehr003: The lead recon armoured car just north of Les Hauts Vent but still on the height overlooking the valley between the German and American positions.
Lehr004: The vehicles move forward at slow speed and well spaced down the main highway. Special scenario rules restrict the player to moving vehicles slowly until a burning building or vehicle lights the road section being travelled. This was necessary to recreate the historical situation of a pitch black night and roads bordered by tall bocage severely restricting visibility and the necessity of accompanying infantry to protect the vehicles. Moving faster is possible to players with their God-like view but not to the combatants at the time.
Lehr005a: The lead recon armoured car moving cautiously down the dirt lane on the right flank. Note the 'L' tactical identifier. Image with artificial lighting.
Lehr005b: The same as 005a above but with true night lighting.
At this point the lead armoured car on the highway is just beginning to climb the road up the ridge to which the Americans had fallen back after their first (failed) attempt to capture the Les Hauts Vents farm complex.
Attachments

Last edited: