S
Strachwitz
Guest
Great! And a big thank you for your patience answering all these questions again and again! And of course acting as Gamemaster. Without you this campaign never would have started!
@nathangun : I want you to fight the northern battle. I will write detailed orders this afternoon and provide you with information.
@PhilM: Are you now in our out of the campaign? If you are in then I want you to fight the southern Battle. As for the battle above I will write up detailed orders what I expect and whish to achieve.
@PhilM
Southern Battle Orders:
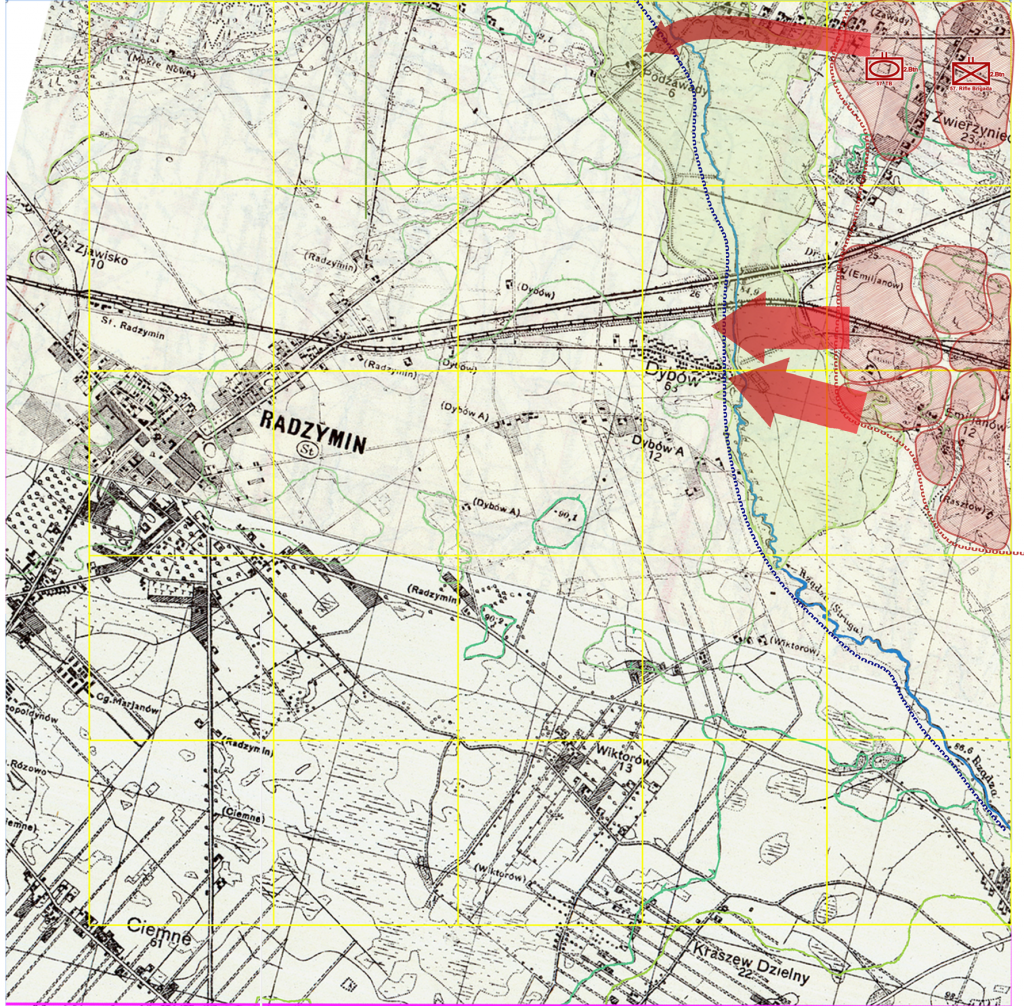
As we were provided with outdated maps by 2nd Tank Army High Command we were unaware of two possible crossing points on our southern flank. Some locals told us about it and maybe this is not as bad as it first looked like. But nonetheless in the first place it is a security risk for our great assault on the village of Radzymin as it leaves our left flank open. Our forces there are not deployed in a defensive posture and you as the commander have the task to establish a defensive perimeter and get into overwatch position of the two fords and the patch of woods on the opposite side of the river.
Friendly Units:
Sapper Company
Infantry Company
Btn HQs with support assets
2x120mm Mortars
4x75mm Field Guns
Reinforcements: 1 Tank Company (11 T-34/85)
Enemy Units:
We have no visual or intel in enemy units in this sector. An OP/LP reported sounds of possible enemy units crossed the fords at night and may be already in the vicinity of you units.
Basic plan:
Establish a defensive perimeter at the wood line and protect the high priority objectives and get visual on the fords and the patch of woods in the opposite side of the river. Besides rejecting a possible Attack or Recon by enemy units we want to get intel on enemy units, especially in the covered terrain on the opposite side of the river. Further we need intel on enemy obstacles or minefields securing the fords. Maybe you see enemy units crossing which could give us precious information about the lay of mines and other obstacles. So watch closely and mark these crossing paths for further actions.
The Sapper Company is to relieved as fast as possible and moved to a secure location in the rear. We need them for other tasks as for fighting enemy infantry. If they have to fight until relived by the infantry company keep their casualties low and replace them fast by frontline infantry.
Move the Selfpropelled Guns in covered overwatch positions of the fords and to support the infantry in case they come into trouble. Keep them hidden in conceal positions as enemy AT-assets and even Panzer could be hiding in the patch of woods opposite to your positions. Also our own air force is flying combat sorties and you know they can't distinguish between us and the Germans. Overhead cover should do well. If targes of opportunity arise you are free to use them at your own discretion but minimize losses and don't use them in an offensive manner.
At 5:40 your reinforcements of 11 T-34/85 should arrive from the north. At this point you are allowed to shift from
defensive actions to offensive actions if the situation permits. By then you should have enough intel on enemy units in this sector and maybe it is possible to secure the crossings for our advance towards Radzymin. To achieve this you must clean the sector west of the fords from enemy units. There is not much they can hide in besides the patch of woods. Use your mortars and artillery to soften up enemy resistance there or smoke them and probe the crossing with cheap vehicles like trucks before sending in your tanks.
Maybe this battle is the most important one today as it possibly gives us the chance to secure a crossing point. Be patient for the first 40 minutes and then strike the enemy hard if your intel reveals the enemy is weak at your position and get those crossings!
We await Sitreps as the battle progresses to asses the situation and change plans accordingly if needed. As soon I get it done you get also a map by tomorrow.
Good Luck Commander PhilM!