Welcome to The Few Good Men

Thanks for visiting our club and having a look around, there is a lot to see. Why not consider becoming a member?

Three Towns (Stafford vs Drifter Man DAR)

Interesting developments. Good contrast between Stafford's gung-ho recon and your more cautious scheming.

Also the overhead maps with notes make it much easier to figure out where event takes place.
 
Interesting developments. Good contrast between Stafford's gung-ho recon and your more cautious scheming.

Also the overhead maps with notes make it much easier to figure out where event takes place.
Thanks - I'll keep them coming. I know that it is hard for a reader to keep all the developments in memory and I don't mind repeating the same information on the maps again and again.

Stafford is actually very cautious. He just chose a few relatively inexpensive units as completely disposable - as long as they gather some intel. In this case I hope the only intel he got was the 75mm in the face.
 
1310hrs, Turn 20. Most of my troops remain in place, only a few scout teams across the map advance forward while artillery is being exchanged between me and Stafford. I see some British infantry retreating from the center after the shelling while 3in mortars target the woods between mine and his troops. I stop my own artillery there because at this point it is not worthwhile, and adjust 150mm guns to target Hill 33. A scout team approaching Hill 36 gets under sniper fire and takes a casualty - again, I'll target the position of the sniper, identified by sound only, with a StuG. A Firefly is spotted by 1/6 hiding behind Hill 36, covering Hill 33. Another aircraft passes overhead: A Spitfire I think, by the sound of the engine.
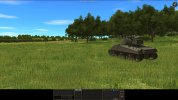
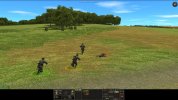
Turn020a.jpg
Turn020b.jpg

Situation update, 1310 hrs, 20 minutes in. In this opening phase I used the extra mobility of halftracks to reach North Ridge, which gives me good view all the way back to the British setup zone, as well as to secure the southern edge of the map with an infantry position just west of Hill 33. However, I was prevented from reaching the woods southwest of Louvoy and Hill 36. I expect things to stabilize for some time - we are set up for a battle of attrition, in which we will try to whittle each other down with artillery. The aircraft confirm this pattern - Stafford uses this asymmetric option to prevent me from using vehicles for transport, quite essential on a map of this size, and to chip away on my force. I will seek to move forward but the priority will be locating and hitting Stafford's troops without taking too many hits myself. Brace for a long battle. I should say that British infantry is better suited for this kind of warfare than panzergrenadiers, but let's see what we can do.

I can try to piece together what Stafford could have:
2x Infantry Battalion, with PIATs and on map mortars, minus AT guns and pioneers ... 5082 points
Armoured Regiment (Cromwell) - 2-3 troops with Fireflies, a section of Stuarts and a section of Crusader AA tanks ... close to 3000 points, our house rule limit
5x Humber LRC ... 320 points
Transports - 3x Truck, 1x Jeep, 2x Halftrack, 5x Universal spotted so far ... 615 points
Air support ... 348 points
At least one FO ... 63 points
... leaving around 600 points for artillery, maybe two 25pdr gun troops (2x 4 tubes)?

Looks manageable... as long as I can win the armor battle...

Stafford has taken 19 confirmed casualties, mostly vehicle crews of the units he sent out for scouting. Five Humber LRC armored cars and one Stuart V have been destroyed. He has also spent 25 medium mortar bombs.

I have taken 51 casualties, of this 26 is from the strafing Typhoons. Two SPW 251/1 halftracks and one SPW 251/2 mortar halftrack have been destroyed. One StuG III and two SPW 251/1 halftracks have been immobilized. My artillery ammo expenditure looks like this:
81mm: 129/1080 (includes 66 HE lost with the mortar halftrack)
120mm: 11/60
150mm: 9/108
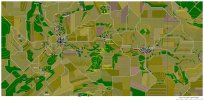
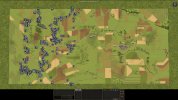
ThreeTowns_TopoMap.jpg
Turn020c.jpg
 
While Hill 36 is not much use to you due to the hilly eastern slope, from the map HIll 36 does look like a very juicy fire base for him, overlooking Wynton and most approaches to the ridges and Louvoy. Is that correct?
 
I guess he's now happy to just sit and defend, as he holds two of the three objectives. Louvoy is firmly in the grasp of ze british empire.
 
While Hill 36 is not much use to you due to the hilly eastern slope, from the map HIll 36 does look like a very juicy fire base for him, overlooking Wynton and most approaches to the ridges and Louvoy. Is that correct?
It does have that potential for him, but it is also very vulnerable for the same reason... if I were him, I would be careful placing valuable units on that hill. Bad stuff is on the way.

I guess he's now happy to just sit and defend, as he holds two of the three objectives. Louvoy is firmly in the grasp of ze british empire.
I think he will sit and defend the center for some time, but the actions so far (and also from the next turn that I have already seen) indicate that he will not be willing to cede all initiative to me.
 
1311 hrs, Turn 21. Scouts are moving forward - the team near Hill 36 takes another casualty before the sniper is suppressed by fire from a StuG. Platoon 1/6 on Hill 33 reports another Firefly tank parked right next to the first one. This sends some alarm bells ringing. One Firefly would be enough to cover Hill 33, two of them tell me that Stafford could be getting ready to take on the StuGs of the 1st Platoon. Everything on the right flank depends on them. They haven't moved since Turn 3 or so, they do not have great positions and he can always see with infantry them from the Hill. The plane, which did not attack in this turn, might be coming for the StuGs - to force the commanders inside, damage optics or even disable one of the vehicles, giving the British tanks an advantage at a critical moment. Or he could use artillery to the same end. I can't move the StuGs, as all other positions are even more exposed. So I think I should attack Hill 36 as soon as possible to drive my opponent's tanks out of their sanctuary on the far slope.

At the same time, British infantry finally appears on Hill 33. Yes, they are carrier scouts. One detachment runs into a panzergrenadier team from 1/6, loses two men and runs away. A second detachment - HQ - moves in to engage while the halftrack is seen departing. This all tells me that my mortar fire on Hill 33 did not have much effect. My opponent expected the attack and simply waited a few dozen meters away for the barrage to end. Fortunately I did not spend too much ammo there. I am sending some more now.

Vulnerable units are again ordered into hiding as the air attack is imminent - mortar halftracks in particular. Mortars have been busy and I have been using the halftrack to supply ammo, so I need to keep them close to my mortar teams while camouflaging them under trees. I don't know if it helps.

Turn021a.jpg

Scouts from Platoon 1/2 are back on their duty on the North Ridge.

Turn021b.jpg

I can see a HQ team just outside an orchard below the eastern slopes of the North Ridge. The only reason I can think of why anyone would expose a HQ team this way is to direct artillery fire. I think I'll let them do it - it should be an opportunity to let my opponent waste some more ammo into empty woods. This is a battle of attrition - 30 mortar rounds can mean more for victory than some HQ.
 
1312 hrs, Turn 22. The fighting along the center erupts anew. The infantry team at the tip of my advance, with Hunt order gets under fire from unknown position. The normal reaction would be to stop, go to ground, look around where it is coming from. No, they continue until they take a casualty - a Gunner of course (this team has two). It looks like the infantry that was directly in the way has retreated under mortar fire, but the other teams that supported them remained in place. This time I am trying to get them under area fire from other teams before I try to come closer. It does not help that enemy mortar fire has intensified and gained accuracy. One man is lightly wounded and this time the covering StuG is targeted, too. The commander is forced inside and I order the StuG move back while an infantry team covers it with smoke - I just find out that StuGs do not have smoke mortars.

I now have visual contacts of two snipers on Hill 36 - they have already claimed six of my men. One scout team gets within 20 meters of one sniper but still can't, won't see him, while I hear the sniper has spotted them, so they are only two shots away from their deaths. I order them to area fire at 20 meters and hope they'll get oriented soon.

Turn022a.jpg

In the south, at Hill 33, a third enemy soldier is hit, but no more contacts are reported. I think that Stafford is trying to sneak in the 2in mortar to bomb my platoon before he orders the rest of the scout section to attack. I order the engaged team to area fire the last contact position for 15 seconds, then retreat back by two action spots.

Turn022b.jpg

More empty vehicles - Universals - are spotted moving back to the setup zone north of Halberg, while an unknown tank contact is reported in the hills north of Louvoy.

I send the turn to my opponent with a silly order for one StuG that I forgot to cancel. It should not be a problem as it will not get there in 60 seconds, but it reminds me how much focus this monster battle requires...
 
The infantry team at the tip of my advance, with Hunt order gets under fire from unknown position. The normal reaction would be to stop, go to ground, look around where it is coming from. No, they continue until they take a casualty
*sigh* yes, it's one of the really silly things about this game. I've been trying to draw attention to it on the forums, with the usual results.
 
1313 hrs, Turn 23. Bad news on bad news. The alarm bells rang but too late, and the air attack focuses on my 1st Platoon of assault guns. One vehicle is taken out just like the company HQ was - except this time mobility is not impaired. Still, two crew members are killed and the rest bails out in panic, so the StuG is as good as destroyed. This leaves me with 6 StuGs against estimated ~12 enemy tanks, but it gets worse - the plane (a Typhoon again, not a Spitfire) will attack again and I would have to be lucky to extract more than one StuG from the target zone.

Turn023b.jpg

My opponent's Fireflies are waiting behind Hill 36, just one kilometer away, for their opportunity for a risk-free kill. I decide to scatter the remaining two StuGs and throw two halftracks into the area as decoys - unrealistic maybe, but I am fighting for survival now. If I take one more loss, I am defending for the rest of the battle. If I take two, the whole right flank will collapse and Stafford will just roll over me. There is a chance that the Fireflies will try to take advantage of the mayhem and attack right now - which would catch my StuGs out of their hull-down positions and on the move - but staying in place is no better. It is more likely, in my opinion, that Stafford will just wait for the plane to finish the job, to minimize risk to his tanks.

It was a mistake to bring StuGs. Of all possible choices of armor (maybe except Jagdpanzer IV) this one was worst. Outrageously expensive and vulnerable. With Pz IV I would at least have decent numbers to cover the map. Even a Cromwell can kill a StuG frontally if it hits the superstructure - I hope Stafford doesn't know but maybe it doesn't even matter if he does.

Other than that, both snipers packed up and escaped - one under covering fire of a halftrack from Hill 33 (good one Stafford: I saw the halftrack but did not connect the dots what it is doing there).

Turn023a.jpg

Low intensity fighting continues at the center - mainly British mortars and the panzergrenadiers slowly edging forward. Scouts on the north ridge report that the bus is coming back. No firm contact, but I hope it is fully loaded and order my StuG forward.
 
Looks like the lacknof a no-airplane rule is seriously hampering you now.
 
You chose StuGs knowing full well they were not the optimal choice, so I wouldn't call it a mistake but rather a brave choice. And it makes for a more interesting AAR too.

However, I doubt you would have seen better results with Panzer IVs.. They are around 240 points if I remember correctly, compared to the 260 for a StuG. The pricing for German armour is off, as I've repeatedly pointed out on the forums, but now I'll shut up before I earn a lifetime PITA award :)
 
Looks like the lacknof a no-airplane rule is seriously hampering you now.
It may be a strange thing to say in the situation but I like aircraft - I like the somewhat random/uncontrollable way they affect the battle. They adds variety to the game - and atmosphere as I mentioned. They shouldn't be overdone - 4 aircraft per 10,000 points are not excessive, although if Stafford keeps sending more I might get grumpy.
What is hampering me is the rule limiting armor to 30%. We both have this limitation, but he invested in an asymmetric weapon that eats from my 30%. I don't have anything to balance that, so I am basically set up to lose the armor battle. I would have easily spent 50% on armor, instead I have a host of infantry I have no use for.
 
You chose StuGs knowing full well they were not the optimal choice, so I wouldn't call it a mistake but rather a brave choice. And it makes for a more interesting AAR too.

However, I doubt you would have seen better results with Panzer IVs.. They are around 240 points if I remember correctly, compared to the 260 for a StuG. The pricing for German armour is off, as I've repeatedly pointed out on the forums, but now I'll shut up before I earn a lifetime PITA award :)
I did not know full well - I didn't test them with aircraft. I thought they'd survive a strafing attack - lose optics and radio maybe, but not crew.

Yeah Pz IV is 233 points vs. 284 for a StuG (in a formation) - I would have 12 of them... slightly better than what I have :)
 
I did not know full well - I didn't test them with aircraft. I thought they'd survive a strafing attack - lose optics and radio maybe, but not crew.

Yeah Pz IV is 233 points vs. 284 for a StuG (in a formation) - I would have 12 of them... slightly better than what I have :)
I didn't know they were not strafing-proof either. My only experience with strafing has been with the US .50 planes and stugs survive those.

Are Panzer IVs proof against 20mm armed aircraft?

Are Panthers? They seem to have two big vulnerable air intakes on the rear back hull.
 
Last edited:
I didn't know they were not strafing-proof either. My only experience with strafing has been with the US .50 planes and stugs survive those.

Are Panzer IVs proof against 20mm armed aircraft?

Are Panthers? They seem to have two big vulnerable air intakes on the rear back hull.
From my testing, those MG-armed planes are good for suppressing infantry and destroying soft-skinned or lightly armored vehicles. They have a lot of ammo but cause more suppression than kills.
Panthers are proof against 20mm (except radio and optics of course). Pz IV - I am not sure. I did not test them much. I remember I achieved a penetration of their top armor but no significant damage. I think they are much more resistant to air attacks than StuGs, but don't take my word for it.
 
1314 hrs, Turn 24. More bad news. The plane does not come back - I don't know how Stafford achieved that, have to ask him. But while my StuGs are trying to scatter, Stafford lines up his entire tank force on Southern Ridge for a shooting exercise. I was aware this possibility but running for cover seemed like a better idea than waiting for the next pass of the Typhoon. At least I tried to build a smoke screen on South Ridge to complicate spotting and aiming, but it was too little too late. The two Fireflies fired two rounds each, already the first shot killed one StuG (lower hull front, about 650 meters - entire crew instantly killed but surprisingly did not catch fire. StuGs don't burn well). The last StuG - HQ - has some chance to escape because it is reversing away at 1200 meters, but this terrain, as I said earlier, is extremely unfavorable for retreat. My StuG will have to keep going in reverse for most of the next turn before it gets out of sight.

The crew of the first StuG that bailed out after the air attack quickly regained their composure and I am ordering them back, while a mortar has been trying to give them a smoke screen. Their chance to survive the next 1-2 minutes is zilch, but I have to try.

Turn024b.jpg

Based on the contacts I am looking at two troops of a Cromwell squadron - 6 x Cromwell, 2 x Firefly, core of my opponent's armored force. I would probably have lost anyway, but the air attack enabled him to achieve an easy victory with no casualties (more accurately, with not even a shot having been fired at him). The whole "bowl" southeast of Wynton is now Stafford's to take, and I am evacuating 5th Company from the center before they get cut off.

Far north, a fully loaded truck with an infantry platoon passes under the nose of the StuG on the North Ridge, which refuses to see. I'll keep them there for 45 seconds - they still have an opportunity before the truck vanishes from view - then pull them back to reinforce the defence of Wynton.

Turn024a.jpg

Other than that, British mortars score their first kill at the center - and guess who, a Panzerschreck. Shregg is no longer mit uns. I'll do my best to recover the tube before I retreat. A scout team north of Louvoy is driven back by an AA Crusader, taking one casualty. And the StuG company HQ has finally come around and returned to their crippled vehicle. Immobilized and with a two-man crew, but covers the road to Wynton and is better than nothing. The radio is still in working order and C2 links are reestablished.
 
Hmm.. I think the MG planes are pretty good at taking out infantry and halftracks though. I don't think of them as suppression weapons.

About the battle at hand, yes it does look a bit bleak now. But all is not lost. You still have 5 StuGs left, if I'm not mistaken?
 
Last edited:
Back
Top