Welcome to The Few Good Men

Thanks for visiting our club and having a look around, there is a lot to see. Why not consider becoming a member?

Cold War: Skirmish at Sichenhausen DAR

Paleolithic Monk

FGM Company Sergeant Major
FGM MEMBER
Joined
Mar 31, 2018
Messages
746
Reaction score
1,432
Age
56
Location
Colorado Springs, Colorado
Starting a Cold War scenario between SGT Grunt and myself. Here are the opening screens for the upcoming DAR.
DAR SaS 1.JPG

CPT Westfall, commander of A Troop, 1/11th ACR, briefs 1LT Flores and SFC Christie on the development of Soviet hostility in the town of Sichenhausen. A Troop has been ordered to secure Sichenhausen and the vital bridges that will allow for V Corps (higher) to conduct a counter-attack when a mobile force is fully formed up.
DAR SaS 2.JPG
 
Last edited:
Skirmish at Sichenhausen brief:

This battle will take place just two days after Soviet forces pushed into West Germany on the 29th of April, 1981. NATO is scrambling to prepare defensive lines while planning a counter-attack. I’ll be playing as a small mechanized task force spliced together to act as an advanced heavy scout team and secure vital bridges in the town of Sichenhausen.

I received my marching orders to move as quickly as possible to Sichenhausen, scout the area, seize critical bridges and prepare to defend against a larger Soviet force. Once in place, I’ll have 1 hour in order to achieve my objectives.

I’ll be in command of-

Mechanized HQ element, led by CPT Westfall, consisting of the command team/RTO, Forward Observer team, Stinger AA missile team and two M113A2’s for transportation/defense. Total of 12 troops.

Mechanized Scout PLT (1st PLT), led by 1LT Shade, consisting of the command team/RTO, two scout teams and three M113A2’s for transportation/defense. One attached Tank PLT, led by SFC Christie, consisting of four M60A3 Patton tanks. And one attached Anti-Tank PLT, led by SGT Denny, consisting of two M109 Advanced TOW vehicles. Total of 38 troops.

Mechanized Engineer PLT (1st PLT/58th ENG), led by 2LT Bishop, consisting of the command team/RTO, two engineer squads and three M113A2’s for transportation/defense. Total of 21 troops.

Total troops= 71 Pixeltruppen

I will also have a dedicated mortar section, consisting of 3 M50 106.7 (4.2 in) mortars with 90 rounds of HE and about 60 rounds of WP

Sichenhausen- Small West German town nestled low between surrounding high hills and forest. Consisting of about 50 structures, mostly stone and wood construction. Troops will be able to utilize these as good cover. Unfortunately, so will enemy troops. Key features are 2 stone bridges that are sufficient to hold the weight of our heaviest armored vehicles. Primary is the north bridge (bridge #1) as it is along MSR Charlie. The south bridge (bridge #2) can be utilized if the north bridge is damaged/destroyed.

According to my OPORD from S-2, the suspected enemy unit operation in this area is believed to be elements of the 39th Guards Motor Rifle Division. As a Guards unit, I should expect their troops to be well trained, motivated and armed with the newest equipment. 4 BRDM’s were reported in the area by local nationals and this was partially confirmed by my HQ element sighting 2 BRDM’s enter the north side of the town and move behind cover. Their current location in the town is unknown, but my scouts should sight them soon. In addition, S-2 assesses the enemy formation to include an engineer PLT and attached AT assets. Enemy armor is unknown at this time, but I have assets to deal with that threat if encountered.

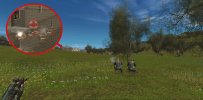
Battle space as seen from the friendly side.
DAR SaS 3.JPG

TACTICAL LOOK 1101 HRS (+1 min)

I have identified four main points of KEY TERRAIN in the area.

KT 1 – Town of Sichenhausen. Contains the primary objective and will serve as a defensive/ counter-attack point.

KT 2 – Hill 406. Absolute dominating terrain feature in the area. Superior elevation oven my formations. Good cover/concealment form forested areas. VERY likely avenue of approach for SGT Grunt’s forces.

KT 3 – MSR Charlie. Paved road, high-speed roadway. Another likely avenue of approach. This is the route V Corps will utilize for the planned counter-attack.

KT 4 – Church. Sturdy stone structure that is on the friendly high ground. Will afford an excellent line of sight and provide cover.


Overwatch Position. Currently the main HQ element is occupying. The FO team will probably remain there for the entire battle, along with the Stinger AA missile team. The CO, CPT Westfall will be repositioning forward as the battle progresses.

Scouts. The scout platoon will advance in their M113’s to the outer edge of town. From there, they will advance cautiously on foot until contact with the 2 BRDM’s is made.

Engineer PLT. The engineers will move forward to the southern edge of town near the alternate bridge objective. From there, they will establish a blocking position.

Tank PLT. The Patton’s will be generally split in two teams and shadow the scouts and engineers respectively. They will cover forward movements and maintain a watch on Hill 406.

M109 AT tracks. These AT assets will take up high ground in order to spot, identify and destroy enemy mechanized or armored assets that attempt to move into the battle space.

As identified by the red arrows, I suspect SGT Grunt will seize Hill 406 as soon as possible and attempt to establish a superior firing position over my forces. I also think he will attempt at least a probe down MSR Charlie to scout it as a quick access to the town.

My current security plan is to advance my forces forward, somewhat quickly, in order to establish a secure foothold on at least two access points to the town. A few of the tanks, M113’s, M109’s and the FO team will maintain a constant orientation on Hill 406 as that is my current biggest threat.
DAR SaS 4.JPG

Mortar support, always a good thing.
DAR SaS 4a.jpg

M113A2’s belonging to the HQ element in position.
DAR SaS 5.JPG

The biggest gun I have for this battle, the M60A3 Patton. 105mm main gun with a capable battle carry of 63 main gun rounds (HEAT, AP and WP Smoke). Also mounts a .50cal MG and a 7.62mm COAX MG.
DAR SaS 6.JPG

The deadly, but poorly armored M901. Packing 2 TOW missile launchers in its distinctive “hammerhead” turret. Battle carry of 10 M220A1 improved TOW missiles. These are more than capable of destroying the best Soviet armor, with a good hit.
DAR SaS 7.JPG

1st ENG PLT moves forward.
DAR SaS 8.JPG

Scouts OUT! SSG Sassner moves his team within sight of Sichenhausen. No contacts yet.
DAR SaS 9.JPG

SGT Denney has maneuvered his M901 AT track to a battle position with excellent overwatch of MSR Charlie.
DAR SaS 10.jpg
 
Last edited:
TACTICAL UPDATE 1 1104 HRS (+4 min).
My formations are advancing as planned so far. Vehicles assigned to overwatch are in place and I’m fairly confident Hill 406 is covered. To that end, I have my first contact! I knew SGT Grunt would be rushing Pixeltruppen up there!
DAR SaS 11.JPG

1LT Flores, FO team, has identified an enemy scout team, possibly a HQ unit, creeping over Hill 406. Standard Guards uniform and equipment.
DAR SaS 12.JPG

One of my Patton’s has also identified the enemy scout team and sent them a 105mm HE welcoming gift.
DAR SaS 13.JPG

My engineers have reached their dismount point. As usual, SSG Landrum is the first out of the track. Nearby, SSG Finley leads his squad out of their track.
DAR SaS 14.JPG

SSG Finley and his engineers have sighted bridge #2.
DAR SaS 15.JPG
 
Last edited:
“Papa Three Six, this is Hotel One Three Alpha, Adjust Fire, over.” 1LT Flores calling in a linear fire mission, to the mortar section, targeting the forward slope of Hill 406. Going to start blasting that big hill for a while and see what shakes loose.
DAR SaS 16.JPG

Things are getting interesting now. Spotted one of the BRDM’s lurking around the corner of a house. It was able to pop off a burst from it’s 14.5mm MG and kill one of my M113 gunners before reversing out of sight again. At a much greater distance, east of MSR Charlie, one of my gunners in the over watch position has spotted what they thought was a BMP-1. He didn’t see the AT missile on top as expected, but did note the turret looked wider and there were multiple optics on top. Looking through his vehicle ID book, he corrected his observation to naming the vehicle as a BRM-1, combat recon vehicle.
DAR SaS 17.JPG

This cold war just got hot! Both engineer squads had split into two fire teams and as the Bravo teams moved closer to town and bridge #2, an enemy recon team concealed in the second story of a house engaged them. The other engineer teams returned fire and a few well aimed bursts from one of the engineers M113 .50cal MG wiped out the enemy team, but not before inflicting 4 friendly causalities.
DAR SaS 18.JPG

So, I had two M113’s cross this little creek without any issues, BUT this big ole’ tank just threw track! Immobilized for the rest of this battle. Oof, quite the hit to my firepower for such a stupid event.
DAR SaS 19.JPG
 
TACTICAL UPDATE 2 1107 HRS (+7 min). This battle is beginning to heat up. After getting ambushed and losing 4 Pixeltruppen, the dismounted engineers are down to 73% strength. Still a capable formation. One of the Bravo teams, led by SPC Tan, have secured bridge #2, but won’t be able to hold it if attacked by light armor or a tank. The other engineers have thrown a few smoke grenades and are getting ready to move into the SE corner of town.

CPT Westfall hopped back into his M113 and repositioned the command team at the stone church. He still has a good view of the battle from here.

On the SW corner, 1LT Shade and one of his scout teams are preparing to secure a foothold in Sichenhausen. He’ll have one of the Patton’s right behind him and one of the M113’s providing overwatch as well. Let a BRDM or enemy scout team pop up now! On that note, looking into the manual shows the BRDM has a crew of 2 and an additional 4 seats for passengers. Since I destroyed a four man team that shot up my engineers, it’s a fair assessment they came from the BRDM I have previously spotted, and the other BRDM has probably dismounted another four man recon team in town. I’ll need to be on the lookout.

Hill 406 is starting to display sound contacts that are currently identified as some sort of tank(s). Wow, S-2 DID NOT mention tanks! I still have a Patton and a M901 AT covering the hilltop, so I hope I see them before they see me. The planned mortar call for fire has dropped a few spotting rounds right where they should be and fire for effect has been called. I hope to catch some infantry or vehicles in the fire mission as they move down the hill. Speaking of mortars, SGT Grunt has initiated a fire mission against my forces as well. So far, a single spotting round blew up just outside the western edge of town. Not sure if he’s trying to hit the church of my scouts, so I’ll need to make a note of the follow-on spotting rounds.
DAR SaS 21.JPG

Whoosh! My first TOW shot this battle! Note tube 1 is empty in the model and tube 2 still has a missile visible. It’s the little attention to details. This launched missile is streaking towards the combat recon vehicle, but in true Combat Mission turn based fashion, the turn ended before the impact. Now I have to wait and see if it hit the target.
DAR SaS 22.JPG
 
It's a hit! One scout recon vehicle killed. As you can see from the exhaust smoke, he was backing up as fast as possible, must have seen the TOW missile streaking at him, but couldn't out-run it. Hope that degraded SGT Grunt’s observation and spotting capabilities a bit.
DAR SaS 23.JPG

On the SW side of town, the scouts, with tank support, have established a foothold and have pushed a team in their M113 forward.
DAR SaS 24.JPG

SPC Tan and another engineer have dug-in the best they can and now have a supporting M113 to hold bridge #2.
DAR SaS 25.JPG

With a single well aimed .50 burst, a M113 gets a confirmed kill on the first BRDM encountered. There was a muffled explosion from inside the BRDM and then it started burning, no one made it out. The second BRDM was similarly killed by a M113 after several bursts to the front. This enemy vehicle managed to get a few rounds out, but to no effect against my troops.
DAR SaS 26.JPG

Combined arms at work! Nothing encourages the troops on the ground more than a tank in direct support. Here the Patton is firing a few HE rounds at the identified second enemy recon team.
DAR SaS 27.JPG

Detail of the main objective. Bridge #1 is my objective to seize and hold, and I have the feeling that is also SGT Grunt’s objective. The red arrow indicates the two-story house that the second enemy recon team is defending. I don’t think they stand a chance against two of my M-60’s blasting it.
DAR SaS 28.JPG
 

Attachments

  • DAR SaS 18.JPG
    DAR SaS 18.JPG
    509.7 KB · Views: 3
This turn must have hurt for him, losing 3 vehicles. Was this his main push with the recon teams or do you expect him to stage a seperate full stage attack later / somewhere else?
 
@Blady , The kills were over a couple turns, but it was costly. The scenario had his recon of the 2 BRDM already in the town. I didn’t expect the two dismounted teams with them. The second BRDM was a coordinated effort. Moved a noisy tank to one side and flanked with a M113. his .50 cal made short work of him.
I think SGT Grunt is building up a good ole’ Soviet rush on the town, so I’m getting my Dragon equipped troops in firing positions while my armor positions for better firing positions. I did miss my second TOW shot at one of his tanks. It backed up out of line of sight before the gunner got the missile on target.
Really enjoying Cold War.
 
Both the engineers and scout teams are advancing rapidly through the town. I had to redirect this scout team to keep moving as they were trying to sneak into the pub for a few beers!
DAR SaS 29.JPG

SGT Grunts' bears have awoken! I have to contend with a platoon of T-64's coming over Hill 406.
DAR SaS 30.JPG

TACTICAL UPDATE 3 1115HRS (+15 min).
Movement through Sichenhausen has been at a rapid, but safe speed. I've been wiping out enemy contacts as they pop up. To be fair though, the small Soviet recon element in the town is severely out-gunned.
Bridge #2 is still secure and bridge #1 will be in a turn. The BRDM's are destroyed and soon any of their dismounts will be too.
Hill 406 is really heating up! I'm blasting it with my dedicated mortars and assigned over watch vehicles. My M901 tucked in tight at the church is starting to rack up some kills! I know it has SGT Grunts attention now!
An element of BMP-1's are trying to sneak over the other side of the hill, but one of my covering M-60's put two AP rounds through the lead vic, destroying it.
No real movement on the other side of MSR Charlie, other than the command BRDM that CPT Westfall has been monitoring. I don't have a direct fire system to get him, yet. I'd really like to kill the enemy commander.
Overall this battle is going well for my side. I still have several vehicles covering SGT Grunts likely approach routes and am going to secure the objective in a turn. From here, I'm in a defensive posture. Hold until relieved.
Updating a BDA to higher, CPT Westfall has sent the following information-
Current enemy losses at 6 armored vehicles- 2 BRDM, 2 BMP-1, 1 BRM recon vehicle, and 1 T-62 MBT. Total crew and dismount causalities estimated at 23.
Current friendly losses- 1 M60 Patton immobilized, but still functional. 1 M113 gunner wounded, 3 Engineers wounded and 1 Engineer KIA. Total 5 causalities.
DAR SaS 31.JPG
 
Last edited:
My defense of Sichenhausen is still solid. SGT Grunt is moving his forces closer, but Hill 406 is actually turning into a disadvantage for him. Since I have a majority of my forces in the town now, his tanks and APC's need to go over the military crest of the hill to get a shot. When he does, I engage with my covering tank and M901's.

Charge of the light Brigade! I have to destroy these threats before they can start blasting my armor!
DAR SaS 32.JPG

Speaking of M901's, this hero had at least 3-4 kills, including 1 T-64, before taking a 125mm round to the front. All crew lost, so my causalities are increasing. I have lost o few dismounts in the town from enemy tank fire as well.
DAR SaS 34.JPG

These sum' bitches are tough! I'm expending sooo much ammo and what precious few TOW and Dragon missiles I have to disable or destroy them.
DAR SaS 33.JPG
 
The shoot-out on top of Hill 406 is quiet for now. Three (of four??) T-64’s are now burning. Hell of a bunch of bullet sponges! I think I hit the last tank at least 20 times with rounds from one of my Patton’s and a few Dragons. Even got a TOW missile in there for the kill.
DAR SaS 35.JPG

TACTICAL UPDATE 4 1124 HRS (+24 min).

Most defensive positions in Sichenhausen are set. I’ve been conducting small movements to keep SGT Grunt guessing on where my Pixeltruppen will be, or maybe make my forces look larger than they are.
Bridge #2 is still secure as well as bridge #1. I have troops and a M113 covering as well as a M-60 tucked in close.
Newest threats are the three BRDM-2 AT-5’s rolling up. One is closer and I’ve been plinking away with a few .50 cal MG’s from M113’s. A few penetrating hits and weapon hits, so it might be degraded. One of the others fired a missile across the battlefield and destroyed one of my M113’s making a break for a forward firing position.
Not too sure what’s next for SGT Grunt’s attack. I don’t think he’ll try cresting Hill 406 again. I’m covering the other two sides and the MSR Charlie approach.

Current enemy losses at 8 armored vehicles- 2 BRDM, 2 BMP-1, 1 BRM recon vehicle, and 3 T-62 MBT. Total crew and dismount causalities estimated at 27-29.
Current friendly losses- 1 M60 Patton immobilized, but still functional. 1 M113 destroyed. 1 M901 destroyed. 3 M113 crewmen wounded, 4 M901 crewmen killed. 1 Scout killed. 1 Scout wounded. 3 Engineers wounded and 1 Engineer KIA. Total 13 causalities.
DAR SaS 36.JPG
 
At 31 minutes into the battle, a ceasefire has been called. SGT Grunt has attempted several attack routes, but between my M901's, Patton's and Dragons, each attack was thwarted. Perhaps a combined attack from several directions at once might have pushed past my defensive line? One of my M901's was destroyed and the other was down to 2 TOW missiles.
The Soviets lost 12 armored vehicles, with 7/12 killed by the M901's, 3/12 killed by just one of my M-60's, and the other two kills' were the BDRM's in the town, and those were taken out by two M113's and their .50cal MG's.
My forces were able to get to, secure and hold both bridges for follow-on forces.

This was a fun and tactically challenging scenario. The American M901's were the hero's of this particular match, but they are easy to destroy, so target them as soon as you see them in the future.

DAR SaS 38.JPG
 
Back
Top