


A FGM ARMA3 SQUAD message on behalf of @Josey Wales posted by @Badger73
@Josey Wales organizes FGM Aram3 Squad WW2 co-op play sessions once or twice a month. Here are some of the things we've covered already in our past training sessions and combat missions. If you missed previous sessions, review what we've done and come join us soon. If you've participated in previous sessions, here's my notes of what we've covered. Arma3 is an exceptional co-op game experience. It's WW2 mods add a whole new dimension to our other Combat Mission CMx2 game play experiences too.
Where to find us: We play on Steam. Check out Steam Group "FGM Arma3 Squad" and request to join. This is where we schedule future sessions and provide the Server name and password for scheduled sessions.
==================================================
JOINING A SESSION.
This assumes that in Steam, you have 'Friended' other FGM members and already joined Steam Group "The FGM ARMA3 Squad" in the Arma3 Steam community.
To join a session in Arma3, go to the servers tab within the game and look for Friend's servers. When you find the one scheduled, join it. Once there chose a role suitable to your experience and skills
1. No team killing
2. No shooting in the base/briefing area
3. Magazines & clips to be removed from weapons whilst in the base/briefing area
4. No swearing
5. No picking up enemy weapons or using enemy equipment
When you first join a game session, you will be in a Base Camp / Training Assembly Area. First thing you do is unload you weapon in Base Camp / Assembly Area.
The Base Camp / Assembly Area is where the session leader will go over the game planned for that session. The session will usually consist of 2 parts. The first part will be going over drills and procedures, and the second part will be a mission. After initial assembly, your Squad Leader will tell you what role to adopt and what equipment and ammo to bring for the mission.
In the Base Camp / Assembly Area - establish team communications for the game by using the Comma key [,] to change communication channels between Global and Group. Use the channel instructed in the briefing.
===================================================
REVIVE / RE-SPAWN
When you are shot you will become incapacitated for 2 to 3 minuts before you bleed out and die. During this time you can be revived by any player. Medic players can revive you much quicker than the non-medic roles. You can force a re-spawn, but it is not recommended as it will take you longer to get into the fight. The re-spawn counter is a couple of minutes long.
If you are revived by another player, you continue from where you are with the equipment you had before you were shot. If you re-spawn you return to life in the game and re-spawn in Base Camp.
Once there:
1) First, re-equip yourself at the supply truck & ambulance. Re-stock all your ammo, grenades, & first aid.
2) Second, cycle to Global Channel, tap Fwd Slash [/] and type text message "Request Transport"
The mission controller (Zeus) will get you back with your squad and back into the fight.
===================================================
Tip: GRENADES
You can select between frag and smoke grenades within the game.
[CNTL+G] to cycle through and select desire grenade you want to throw. This will show in the Stance Icon in the upper left hand corner HUD of your screen.
[G] = throw the grenade at the player aiming point. Make sure to press Talk [CAPS LOCK]) and yell "Frag Out!" or "Smoke Out!" each time you throw.
===================================================
3RD PERSON DISABLED
In these sessions, 3rd person view is disabled. We play from the first person perspective. I use a mod which replaces 3rd person situational awareness of your immediate surrounding teammates with a graphical user interface called ShackTac UI. It shows your position relative to any other squad mates within 50 meters of you. It displays as an expanding circle HUD in the bottom center of your screen. The circles show you distances of 15m, 30m, and 50m. Use ShackTac to keep track of teammates

===================================================
These session currently support up to 12 players. This is enough to form a squad. Squads are organized as follows:
1. Able Team
2. Baker Team
3. Charlie Team (when numbers permit)
The command structure within the squad is as follows;
===================================================
MOVEMENT FORMATIONS
Squads move in formations. Movement is by teams within a squad - Able/Alpha & Baker/Beta fire teams
Squad movement formations
Team Movement Techniques
There are a variety of movement techniques that are applicable to Arma's environment and simulation fidelity. Utilizing the best one for a situation will do a great deal to protect a team and provide security as well as flexibility, and it's important that all players are familiar with the differences between the various types.
Bounding Overwatch Guidelines
Here are some general guidelines to keep in mind during bounding overwatch.
Successive bounding overwatch is the slower bounding technique. In it, one team advances, halts, and then the other team advances on-line with them and halts. The process repeats itself. This provides a high level of security, but with the trade off of taking longer to employ.
Alternating Bounding Overwatch
Alternating bounding overwatch is the fastest of the two, sacrificing some security for additional speed. In this mode, the teams bound past each other before stopping and allowing the other team to pass them.
===================================================
FIRE AND MANEUVER
Bounding overwatch should be used any time that contact is likely or imminent. The security of having an entire element (be it a squad or fireteam) specifically scanning for threats while another element moves is enormously beneficial to the team. The voice command to initiate bounding overwatch is along these lines:
Note that bounding overwatch changes to fire and maneuver once contact has been made. The same basic principles apply as with bounding overwatch, with one team putting down fire while the other team maneuvers to a new position, at which point the moving team takes position and begins firing to cover the advance of the other team.
===================================================
CROSSING A DANGER AREA
Danger areas are places where there is a high level of vulnerability for anyone caught within them. They must be treated with due caution. These are places like bridges, streams, large open lanes in forested terrain, or even streets in an urban environment. Danger areas are frequently observed by the enemy, and can have snipers, machinegunners, or enemy rifle fireteams ready to deliver fire into them on short notice.
The technique for crossing a danger area is another form of bounding overwatch. The idea is to maintain security and cross in small numbers that will not draw undue attention or fire. Once you have determined that you are facing a "danger area" and must treat it as such, there are four basic steps to follow.
===================================================
CONTACT
Contact is the enemy shooting at you. When taking fire do three things first.
Enemy Contact reporting
Alert your squadmates by saying, "Contact". Tell them what you see. Direct them where to look. Tell them how far away to look.
Use the "3D" method after you alert your squad; Description / Direction / Distance. Be brief and decisive.
- ALERT = Telling mates you're under fire by saying, "Contact!"
- DESCRIPTION = A terse sentence about enemy sighted
- DIRECTION = A compass heading (use ShackTac UI) for the direction your mates should look to see the enemy
- DISTANCE = The estimated distance or easy to find landmark where the enemy is located
Examples:
Keep it short and sweet. Be brief and clear.
===================================================
ACTIONS IN CONTACT
There are three (3) Actions in Contact for an Arma3 squad to chose
===================================================
RECAP OF LESSONS LEARNED THUS FAR
MORE LEARNING
If you want to learn more Arma3 tactical lessons, check out dslyecxi's Arma 3 Tactical Guide online edition
or read @Badger73's extract from it attached to this post.
@Josey Wales organizes FGM Aram3 Squad WW2 co-op play sessions once or twice a month. Here are some of the things we've covered already in our past training sessions and combat missions. If you missed previous sessions, review what we've done and come join us soon. If you've participated in previous sessions, here's my notes of what we've covered. Arma3 is an exceptional co-op game experience. It's WW2 mods add a whole new dimension to our other Combat Mission CMx2 game play experiences too.
Where to find us: We play on Steam. Check out Steam Group "FGM Arma3 Squad" and request to join. This is where we schedule future sessions and provide the Server name and password for scheduled sessions.
==================================================
JOINING A SESSION.
This assumes that in Steam, you have 'Friended' other FGM members and already joined Steam Group "The FGM ARMA3 Squad" in the Arma3 Steam community.
To join a session in Arma3, go to the servers tab within the game and look for Friend's servers. When you find the one scheduled, join it. Once there chose a role suitable to your experience and skills
- Newbies - rifleman
- Veterans - medic, BAR
- Highly skilled & experienced - Squad Leader, Asst Squad Leader, Team Leader
1. No team killing
2. No shooting in the base/briefing area
3. Magazines & clips to be removed from weapons whilst in the base/briefing area
4. No swearing
5. No picking up enemy weapons or using enemy equipment
When you first join a game session, you will be in a Base Camp / Training Assembly Area. First thing you do is unload you weapon in Base Camp / Assembly Area.
- Check Inventory [I]
- Beneath your rifle, left click the weapon magazine and drag it to your backpack or battle harness
- Your weapon should now show "empty"
The Base Camp / Assembly Area is where the session leader will go over the game planned for that session. The session will usually consist of 2 parts. The first part will be going over drills and procedures, and the second part will be a mission. After initial assembly, your Squad Leader will tell you what role to adopt and what equipment and ammo to bring for the mission.
In the Base Camp / Assembly Area - establish team communications for the game by using the Comma key [,] to change communication channels between Global and Group. Use the channel instructed in the briefing.
===================================================
REVIVE / RE-SPAWN
When you are shot you will become incapacitated for 2 to 3 minuts before you bleed out and die. During this time you can be revived by any player. Medic players can revive you much quicker than the non-medic roles. You can force a re-spawn, but it is not recommended as it will take you longer to get into the fight. The re-spawn counter is a couple of minutes long.
If you are revived by another player, you continue from where you are with the equipment you had before you were shot. If you re-spawn you return to life in the game and re-spawn in Base Camp.
Once there:
1) First, re-equip yourself at the supply truck & ambulance. Re-stock all your ammo, grenades, & first aid.
2) Second, cycle to Global Channel, tap Fwd Slash [/] and type text message "Request Transport"
The mission controller (Zeus) will get you back with your squad and back into the fight.
===================================================
Tip: GRENADES
You can select between frag and smoke grenades within the game.
[CNTL+G] to cycle through and select desire grenade you want to throw. This will show in the Stance Icon in the upper left hand corner HUD of your screen.
[G] = throw the grenade at the player aiming point. Make sure to press Talk [CAPS LOCK]) and yell "Frag Out!" or "Smoke Out!" each time you throw.
===================================================
3RD PERSON DISABLED
In these sessions, 3rd person view is disabled. We play from the first person perspective. I use a mod which replaces 3rd person situational awareness of your immediate surrounding teammates with a graphical user interface called ShackTac UI. It shows your position relative to any other squad mates within 50 meters of you. It displays as an expanding circle HUD in the bottom center of your screen. The circles show you distances of 15m, 30m, and 50m. Use ShackTac to keep track of teammates
This example shows all six team mates within 30 meters of the squad leader
===================================================
These session currently support up to 12 players. This is enough to form a squad. Squads are organized as follows:
1. Able Team
2. Baker Team
3. Charlie Team (when numbers permit)
The command structure within the squad is as follows;
- Squad Leader - also team leader of Able
- Assistant Squad Leader - also team leader of Baker
- Charlie Team leader - when numbers allow to have a 3rd team in the squad
===================================================
MOVEMENT FORMATIONS
Squads move in formations. Movement is by teams within a squad - Able/Alpha & Baker/Beta fire teams
Squad movement formations
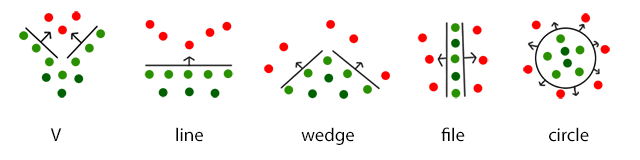
- Staggered Column (pictured as FILE below) - used for moving along a road or track. when enemy contact is possible but not likely. The squad forms a 2 columns either side of the road. This can be achieved by having one team on the left and one on the right of the trail. Each squad member is off set diagonally from the squad members on the other side of the road
- Line (pictured as LINE below) - used when contact is expected or when in combat or . All squad members are abreast of the squad leader facing the same direction. One team will typically be on the left of the Squad Leader and one team will be on the right. This formation allows maximum firepower to be delivered to the front but is vulnerable from the flanks and rear
- Squad Wedge (pictured as WEDGE below) - used when contact is expected. The Squad forms an inverted V shape with the point of the V facing the direction of movement. One team will form one wing on the wedge whilst the other team forms the other wing. This formation sacrifices some forward firepower for greater security and flexibility if contact is made front right or front left.
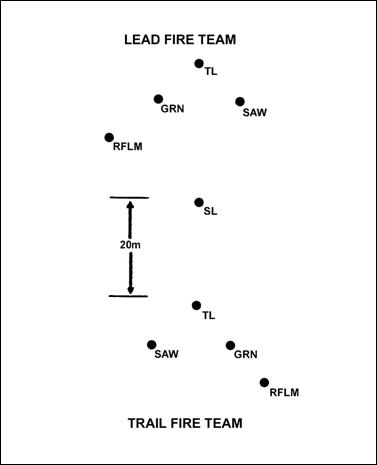
- Team Wedge Squad Column (pictured as "TEAM WEDGE COLUMN" below) - used when contact is probable. Each team forms an an inverted V shape with the point of the V facing the direction of movement. Baker team will be 20m or more in front of Able team which will be in front of Charlie team (if in play) by 20m or more. This formation sacrifices forward firepower to a greater degree but offers good all round security and flexibility.
- 360 (pictured as CIRCLE below, also called "laager" by some armies) - used when halted to provide all round security. The leading team covers 9 through 12 to 3 o'clock. The trailing team covers 3 through 6 to 9 o'clock. Each soldier takes a knee and tells the whole squad [CAPS LOCK] the specific ShackTac UI compass direction they are watching.
Wedge .............................. Line ....................... Squad Wedge.... Staggered Column ........... 360
TEAM WEDGE COLUMN
Team Movement Techniques
There are a variety of movement techniques that are applicable to Arma's environment and simulation fidelity. Utilizing the best one for a situation will do a great deal to protect a team and provide security as well as flexibility, and it's important that all players are familiar with the differences between the various types.
Traveling - Staggered Column
- Traveling uses Staggered Column/Squad Wedge formations. Traveling is simply movement from point A to point B without anything fancy. The spacing between elements is typically small to maintain good control over the unit. Traveling is used when enemy contact is least likely. .
Traveling Overwatch
- Traveling Overwatch uses the Team Wedge Squad Column formation. The distance between fire teams is determined by the terrain and by the Squad Leaders analysis of the situation. . The extra space allows for flexibility, room to maneuver and decreases the density of friendly forces. This increases the security of the squad by making it harder for an enemy to inflict large casualties via a sudden ambush or explosive trap. Traveling Overwatch is used when contact is possible. When moving via traveling overwatch, one team is designated as the lead or "guide-on" group. This team controls the rate of movement or speed of advance, with other teams "guiding" off of them. When this team halts, the whole squad halts. When they move, the squad moves. This helps to ensure that the overall group formation does not overrun itself or get far out of formation.
Bounding Overwatch
- Bounding Overwatch is the de-facto "Standard Infantry Movement Technique" when contact is probable. It is one of the most fundamental combat movement skills practiced and happens to be one of the easiest to employ. The basic principle of bounding overwatch is that one team is always stationary and covering the movement of the other team(s). There are two main techniques - alternating and successive. The choice of which one to use depends on the threat level and the speed required. When not explicitly stated, the bounding method is determined by the second team as it begins to bound - if the threat is high, successive bounds will be employed. If not, alternating bounds will occur. Oftentimes it will become a very fluid execution that blends alternating and successive bounds as the situation requires. Being familiar with all aspects and employments of bounding overwatch allows leaders to be tactically knowledgeable enough to carry out such blended, situation-dependent employments.
Bounding Overwatch Guidelines
Here are some general guidelines to keep in mind during bounding overwatch.
- Team leaders should ensure that the bounding teams are close enough to where they can support each other with fire. With this in mind, it would be wise to prevent two infantry elements from be separated by more than 300 meters, as a general guideline.
- Team leaders should try to get superior ground when providing overwatch. A commanding view of the terrain increases the effectiveness of an overwatch element a great deal.
- The size of each bound should be based on the terrain, visibility, proximity of enemy threat, etc. For instance, bounds across relatively open terrain can be long - both in the interest of getting across as quickly as possible and because the range of the overwatch element is higher due to the open terrain. Urban bounds, on the other hand, are typically short due to the increased density of the area and the desire to maintain security and not overextend any one element.
Successive bounding overwatch is the slower bounding technique. In it, one team advances, halts, and then the other team advances on-line with them and halts. The process repeats itself. This provides a high level of security, but with the trade off of taking longer to employ.
Alternating Bounding Overwatch
Alternating bounding overwatch is the fastest of the two, sacrificing some security for additional speed. In this mode, the teams bound past each other before stopping and allowing the other team to pass them.
===================================================
FIRE AND MANEUVER
Bounding overwatch should be used any time that contact is likely or imminent. The security of having an entire element (be it a squad or fireteam) specifically scanning for threats while another element moves is enormously beneficial to the team. The voice command to initiate bounding overwatch is along these lines:
"Squad, alternate bounding to the SW. 30m bounds. Baker to move first. Baker move when ready"
The response from Baker team leader
"Baker moving"
Once Baker has arrived an their overwatch position Baker team leader reports
"Baker set"
The bound continues until the squad leader calls a halt.
Note that bounding overwatch changes to fire and maneuver once contact has been made. The same basic principles apply as with bounding overwatch, with one team putting down fire while the other team maneuvers to a new position, at which point the moving team takes position and begins firing to cover the advance of the other team.
===================================================
CROSSING A DANGER AREA
Danger areas are places where there is a high level of vulnerability for anyone caught within them. They must be treated with due caution. These are places like bridges, streams, large open lanes in forested terrain, or even streets in an urban environment. Danger areas are frequently observed by the enemy, and can have snipers, machinegunners, or enemy rifle fireteams ready to deliver fire into them on short notice.
The technique for crossing a danger area is another form of bounding overwatch. The idea is to maintain security and cross in small numbers that will not draw undue attention or fire. Once you have determined that you are facing a "danger area" and must treat it as such, there are four basic steps to follow.
- Set up at least half of your force as a security element. Ensure that they are spread out sufficiently that they do not stick out to observation. They will be concerned with watching the flanks and rear as well as observing and covering the scout element when it crosses.
- Send a scout element (typically fireteam-sized) across first while the other elements cover them. The scouts will do a limited penetration of the far side of the danger area, check for enemy forces, and then act as security for the rest of the group when they cross.
- Once the scouts have given the all-clear, begin crossing remaining elements one at a time.
- Once everyone is across, consolidate and continue on with the mission.
===================================================
CONTACT
Contact is the enemy shooting at you. When taking fire do three things first.
- Get into cover or go prone if there is none in the IMMEDIATE vicinity.
- Call out 'Contact' and give a rough direction if possible eg. 'Contact front!'
- Determine if you personally are under fire. if you are remain in cover.
- If safe to do so look out to get information on the situation [CNTL+W].
- If possible expound on the initial contact alert;
Enemy Contact reporting
Alert your squadmates by saying, "Contact". Tell them what you see. Direct them where to look. Tell them how far away to look.
Use the "3D" method after you alert your squad; Description / Direction / Distance. Be brief and decisive.
- ALERT = Telling mates you're under fire by saying, "Contact!"
- DESCRIPTION = A terse sentence about enemy sighted
- DIRECTION = A compass heading (use ShackTac UI) for the direction your mates should look to see the enemy
- DISTANCE = The estimated distance or easy to find landmark where the enemy is located
Examples:
- "Contact Front. South/Southwest. Enemy infantry in treeline."
- "Contact. Due west 100 meters. Sniper in church steeple."
- "Contact Left. Halftrack on road by farmhouse, approaching from Northwest."
Keep it short and sweet. Be brief and clear.
===================================================
ACTIONS IN CONTACT
There are three (3) Actions in Contact for an Arma3 squad to chose
- Break contact - pull back to a safe distance
- Support by fire - call in the big guns to deal with threat
- Squad Attack -use fire & maneuver to close and destroy enemy forces.
===================================================
RECAP OF LESSONS LEARNED THUS FAR
- Understand the squad mission
- Understand your role in mission
- Know who is SL, ASL, Team Leader.
- know who your Team mates are.
- Be patient.
- Be alert.
- Always observe surroundings.
- Move slowly.
- Communicate clearly.
- Follow your leader.
MORE LEARNING
If you want to learn more Arma3 tactical lessons, check out dslyecxi's Arma 3 Tactical Guide online edition
or read @Badger73's extract from it attached to this post.
Attachments
Last edited:


")