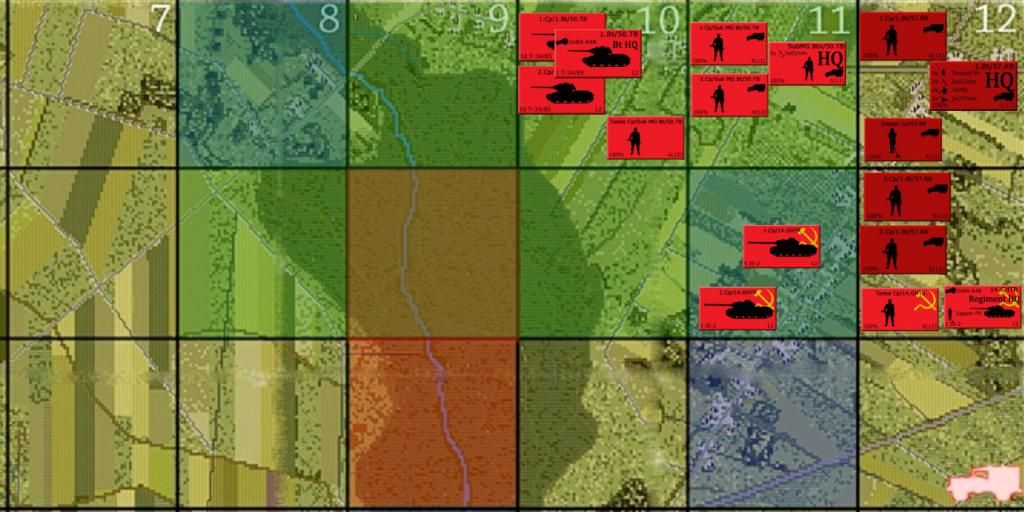
Soviet OOB Day 1

Status
Not open for further replies.
I guess both parties are moved "simulataneously". So there would be a Meeting Engagement exact in the middle.
I also thought about a early counter-attack but for now we have to think of our probing first. But of course the possibility of a counter-attack over the bridges has some effects of our turn 1 positions in the rear. But if we see that the bridges are mined (what I expect) in turn 1 (one of the most important task for the probing) then we cut out the possibility of a counter-attack....

The different units have different movement allowances, to represent the different speeds at which they move in a given battle turn.

So, if they are the same unit type, with the same movement allowances, yep they meet (or should!) "in the middle" ...

But if they are different unit types (and made up of different units each side, and so move at the speed / allowance of the "slowest"??), presumably the meeting point would move towards the "slower" unit / force, to reflect the different movement allowances / speed?

I am presuming something like, each unit moves the same proportion of its total movement allowance in turn, until they either each their destination or a "meeting" occurs ...

So, any unit must move a minimum of one square each step, as that is the minimum "resolution" of the map: so a unit with an allowance of 4 squares uses 25% of its allowance to move one square. Therefore a unit with an allowance of 12 squares gets to move 3 squares in one "step". After all units have moved one "step", another "step" is done by any units with more move instructions, and so on until all is resolved ...??
 
I will reread the rules this evening to see what we are actually gaining from the probe missions.
I had the same thought on the red squares. My plan was to set up a few more probe battles along the river to get a view over the river :). Seems we cam up with the same thoughts and conclusions :)
 
The different units have different movement allowances, to represent the different speeds at which they move in a given battle turn.

So, if they are the same unit type, with the same movement allowances, yep they meet (or should!) "in the middle" ...

But if they are different unit types (and made up of different units each side, and so move at the speed / allowance of the "slowest"??), presumably the meeting point would move towards the "slower" unit / force, to reflect the different movement allowances / speed?

I am presuming something like, each unit mauves the same proportion of its total movement allowance in turn, until they either each their destination or a "meeting" occurs ...

So, any unit must move a minimum of one square each step, as that is the minimum "resolution" of the map: so a unit with an allowance of 4 squares uses 25% of its allowance to move one square. Therefore a unit with an allowance of 12 squares gets to move 3 squares in one "step". After all units have moved one "step", another "step" is done by any units with more move instructions, and so on until all is resolved ...??
Basically all our asstes have the same speed. 12 points unit allowance. Just the heavy tank units have just 10. So I think this is not so important to think about.
 
I just looked it up in the rules and the information gained by "winning" the probe battle revels just information about the square we are into. But maybe we are able to see 2 squares beyond that actual square durin the probe? I don't know.

@Ithikial : OOB and counters are ready and await you in our Dropbox folder :)

Sweet I'll put the action cards into your dropbox folder when i get home from work.

As for the probe, remember you determine how big to conduct the recon mission. The only time you don't is in a meeting engagement situation where it's out of both player's control. Your recon mission can be really small and only cover one campaign square held by the enemy or a large battlefield encompassing many units. How you 'design' the mission is up to you and what gives this campaign rule set it's 'edge' in my opinion. If you win you learn about the forces in that region, so probably more than one campaign squares worth unless you intentionally make the recon mission as small as possible. Your opponents won't know what mission you are on just the same as what kind of mission they are undertaking at the same time.

Beyond the battle, well have to wait and see.
 
I just looked it up in the rules and the information gained by "winning" the probe battle revels just information about the square we are into. But maybe we are able to see 2 squares beyond that actual square durin the probe? I don't know.

@Ithikial : OOB and counters are ready and await you in our Dropbox folder :)

Thanks for doing the counters for our side - they look brilliant! Great work.
 
My guess is movement orders will take some time Ithikal. No so easy as we all have to get used to the rules more and the Action Cards are quite overwhelming to some degree.
Question: I we do a Probe Mission and don`t win this (as I expect) to what degree will the enemy gain intel on us? Can`t find anything in the rules.
Example: If we declare squares A 7 to A11 as our battle and we don`t win this. Does the enemy gather intelligence about units in for example A11. Or to what degree are our counters made visible to them?
 
The Axis forces won't gather intel on you if you lose unless they also set out to do a recon mission from their current positions. If they simply hold up in their defensive positions they can just sit there if they wish.

Though keep in mind both forces will be 'identified' regardless of the result as you can see the in game end of battle situation within CM. The main benefit for recon missions is to learn what you are up against with some relatively easy objectives (touch and spotting), test the enemy's resolve and their capabilities of what they can bring against you in this particular area. Having a win is a bonus as you will also learn unit ID's and how their forces are structured on the campaign map, the status of their forces etc. GM may also throw some bones your way if you win well.
 
Ok, maybe we get our orders out earlier as I expected.
A question regarding the Action cards. When exactly are the played out or better said when do I have to announce them. Before the movement of the counters on the map or afterwards. I am asking as due to FOW rules the enym can see 2 squares deep. So if we move to a location they could see our units after the movements are complete. Are they able to play a Action card now or do they have to decalre the Action cards before the movement?
 
@Ithikial I know my constant questions maybe a bit unnerving but I simply have to. I did some intensive tests with minefields. In order to plot our first turn moves we need to know how we can clear minefields. I tried clearing them with heavy artillery and the success is quite limited. In other words. If I would be the Germans I could lay out minefields in a way that the Russians never would be able to cross the river. How do we address mine clearing?
 
Ok, maybe we get our orders out earlier as I expected.
A question regarding the Action cards. When exactly are the played out or better said when do I have to announce them. Before the movement of the counters on the map or afterwards. I am asking as due to FOW rules the enym can see 2 squares deep. So if we move to a location they could see our units after the movements are complete. Are they able to play a Action card now or do they have to decalre the Action cards before the movement?

I know you have done a load of work already, but are you OK to plot a draft set of movement orders for us ... to discuss and finalise before we submit them?

It seems more efficient than each of us doing our own set, and then trying to merge them into one plan ...

Not sure how best and easiest to do it though: does it need to be shown on the strategic map, move by move? Or just list the moves by map grid references, and show on the map the end position that we hope to get to for our dawn turn probes (plus main forces a few (?) squares back, etc)?
 
I have everything prepared for plotting the moves and getting it to Ithikal in quite an easy way. Was quite some work put it will be of good use for us.
And of course I will do a first draft for us for discussion. But before that I need to know who we treat minefields. There are just 4 crossing points and with mines you could pretty much seal them off...
BTW: I am still thinking about the Probe attacks. As it seems there is not much gained if we do a Probe. We can not see past A8 and due to the wooded area we won`t even see much enemy. We have to cross the bridge. But a small scale recon won`t be able to achieve this. Maybe a full force attack on A7 and A8 with guns blazing could be better as these squares are mandatory to be in our hands. I am experimenting with a attack on the battlefield A10-A7 and B10-7. With a battlefield that size the enemy could maybe expand the battlefield by 2 squares but all additional squares are useless for the enemy. They are open chessfields and not usable for defending....
 
Okay with the battles and possibility of minefields, yep it's going to be bloody if that's how the Germans decide to play it. Lets face it bridges are a key and obvious place to defend. Remember that the campaign level game is just as important as in game. Nothing saying the map can't be edited outside of a direct confrontation. You don't have to clear a minefield 'in-game' if you have the right people in the right location. :) Would be wise to clear the area of Germans and give some orders once the bridges are within your lines. Bend the rules.

Action cards are played at the same time you submit your orders. It's always a risk to use most of them a things may not pan out as you planned. The actions always take place before a battle commences.

As for submitting orders. Grab a copy of the campaign map and place the unit cards in the squares where they will end up after moving with an line/arrow regarding how they will get there. If units are engaging in a planned battle draw a box around the campaign squares you want to include in the fight. (Like the example in the rulebook). Review the map and provide me with information and detail regarding what you want your objectives to be in game for your troops to complete. The better description you can provide the better. Remember to include the amount of pts you want assigned to each objective as outlined in the rulebook. I'll upload a 'master map' into your drop box so you don't have to jump into the editor to review the map.
 
Turn1_example_zps2808aad9.jpg

Click here to see the large version

This is just an example of the map and the counters on it. So we can move around forces and actually see it. Better to discuss things as just writing it down. This is just an example for you guys to see. OK it features a fictional setup for an full blown assault on A8. The plan would be to shell A8 with lots of artillery and rockets and smoke. Basically the bridge can just be shot at from the woods in A8. I guess the bridge has also a TRP on it so fast moving over the bridge and into A8 clearing the woods with our SMG teams of hopefully shellshocked germans. We need to cross open areas fast as the germans rely on long range shooting. We instead are better at close range and hopefully can gain advantage in A8. The ISU-122s could provide fire support from the woods in B11.

But thats just a thought. I still have problems formulating a probe plan that actually has some benefits. As I said earlier we can just get intel if we cross the bridge. Buut small teams have no chance getting over there I fear, that`s why I again think about the full blown assault. Could you think of a proper recon plan PhilM?
 
@Ithikial , you can see that we (or I, at least) are struggling a bit with the idea of probe/recce missions, and what they will achieve.

Against the background that the Axis side have something of an advantage as Odin wrote the rules, is it possible for you to expand a bit more about the mechanics of them, and what would or would not happen about intel gained?

Clearly I don't want or expect you to give us a secret advantage, nor tell us what we should do: but is there anything more you can say about how the mechanics work, for example? In particular re @Strachwitz 's point about us wanting to probe beyond the river square, if possible: does our actual probe attack have to cross the river in the CM game we propose? How many and where do the touch objectives have to be to give us (if we attain them) the enemy OOB and force presence information that we are trying to get? Etc.

I feel like I'm trying to come to a decision on this (which I agree should be testing!) without a full grasp - which is probably my error - of the mechanics of what happens between the layers of the strategic and the CM games ...

I just get a sense that we may find out very little, or get a bloody nose (or both!) on the first few turns and really handicap the enjoyment of the whole of the campaign, for both sides, and end up saying something like: "oh look, that's what happens when you do that ...!!!".

Don't know if any of that strikes a chord; and you may feel you cannot / should not add anything. But I thought I'd ask ...:)
 
@Ithikal: We will have a small change in our OOB. We need some 152mm Artillery to clear possible minefields. I just have to find what has to be dropped....:)
 
@PhilM: 152mm Howitzers come at a cost of about 680. We need two to possibly get rid of minefields after the bridge. Do you see something obvious to drop from our OOB in change for the 152mm? I tend to drop 2 rocket artillery and one 120mm mortar battery...
 
Looking good with the map. just make sure we can read the tokens in the final version, especially me so I know which units to assign.

Happy to help @PhilM and yeah it's cool if you guys need some help early on.

a) (Offensive) Probe / Recon – ‘Knowing who I’m fighting is half the battle.’ This is via a series of touch objectives (minimum 3) that are placed in the opponent’s half of the map, alternatively points can be assigned to a spotting objective against the entire enemy force. Successful completion will lead to information being provided regarding units in the area such as strength, morale etc. Perhaps enemy OOB information? Recon attacks will never secure ground and friendly forces will return to start lines.

1. Regardless of the battle you play and the outcome you will learn the makeup of the enemy forces you faced. This had to be like this because the way CM handles the post game and that players could review the Fog of War free battle anyway.
2. Recon missions therefore provide the bonus of receiving information about the enemy's headcount, command structure, morale etc if the battle is a victory for the recon side. GM can also provide some juicy extras if he deems it appropriate, like you successfully get a platoon across to the enemy end of the map - may see what's lurking behind for instance.
3. Recon battles have touch objectives in the enemy side of the CM battle map. An in game battle map size you determine on the campaign map. The alternative is a to order a spotting objective which means you could technically sit on your side of the river and just try to spot units for the victory. (Risky that you won't succeed though depending on how the Germans react).
4. Recon battles don't have Occupy objectives so you don't need to take and hold ground to win so should in theory be less bloody.
5. Recon battles are also great spoiling or distraction missions if you want to draw enemy forces away from another fight or prevent them acting as reinforcements. (Granted this isn't likely to occur until a few turns into the campaign). Say you are a looking for a breakthrough in the center but don't want a German Battalion in the north from heading south to assist. Simply set up a recon mission over the river in the north with some touch objectives and force a battle here. The objectives aren't to strenuous on your side as an Occupy objective.

The cunning general who can piece together a good strategic plan on the campaign map will have a huge advantage at the tactical level in game. That's probably the biggest aim of this rule set.

And finally here's a big big big hint for dealing with those minefields. Bring any sappers to move in the mined campaign square once you get a foothold over the river? If there's no battle in the vicinity in a later turn you can order them to clear the mines from a campaign square. Bend the rules. :) Be cunning an cheeky. I'm the neutral umpire in all these decisions regarding orders you give your troops.
 
Thank you very much for your patience answering all these questions. I really appreciate it! Hell of a job you have to do.
As for the sappers. I thought of using them that way. Actually this is the reason why we have quite a bunch of them. But getting across the bridge is mined is causing me headaches. We can afford to loose too many tanks to mines :). But I am working on it and found the 152mm howitzers quite usefull for this task. So as I wrote above this will be a minor change in our OOB without a big hassle for you!

BTW: A link to the large version can be found under the picture. I don`t kwno what I am doing wrong to get just the "preview" picture.
 
Status
Not open for further replies.
Back
Top Bottom