The Royal Hamilton Light Infantry secured Oorderen, north of Antwerp, in the middle of September 1944 as the 2nd Canadian Corps began its task of clearing both banks of the Scheldt Estuary. Even once Oorderen was in friendly hands, enemy troops in concrete bunkers to the north of the town continued to snipe the Canadian positions. “D” Company was tasked with clearing them out. In this solo mission, you command a company-strength fighting patrol set on 27 September 1944.
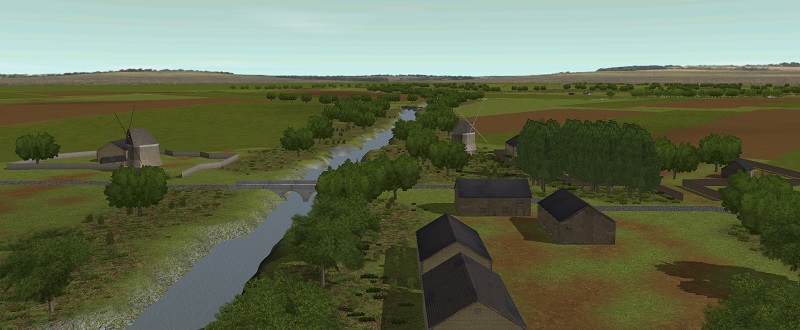
With artillery and engineer support, can you navigate the dyke tops and canals to knock out the German fortifications in the time allotted? Map size: 2160 x 2032m Game length: 120 Canadian force size: Company (reinforced). Terrain type: Dutch* Rural (town, dykes, canals) Weather and Environmental conditions: Hazy, clear. Designed for play as Canadian vs. AI. May also be suitable for H2H – briefing included for the German side, but no AI plan for Allied side. Feedback welcome. Designer’s notes included in scenario file. *Though the terrain in the editor is set to “Holland”, Oorderen was actually just south of the Dutch-Belgian border.
| WHAT VERSION OF COMBAT MISSION IS THE FILE FOR? | CM : BATTLES FOR NORMANDY |
| WHAT IS THE SCENARIO / MAP TITLE? | TWC Semper Paratus |
| FILE TYPE? | SCENARIO PLAYABLE AS H2H AND VS AI |
| DOES THE SCENARIO / MAP REQUIRE BATTLEFRONT DLC OR MODS? | NO |
| WHAT SIZE IS THE BATTLE? | MEDIUM |
| WHAT TYPE OF BATTLE IS THIS? | PROBE |
| WHAT IS THE LENGTH OF THE SCENARIO? | MORE THAN 1 HOUR 29 MINUTES |
| WHERE IS THE SCENARIO / MAP BASED? | HOLLAND [MARKET GARDEN] |
| WHEN IS THE SCENARIO BASED? | SEPTEMBER 1944 |
| WHAT TIME OF DAY IS THE SCENARIO BASED? | DAY |
| WHAT IS THE WEATHER IN THE SCENARIO? | HAZY |
| NATIONALITY OF SIDE ONE | Canadian (R.H.L.I. – 2nd Division) |
| NATIONALITY OF SIDE TWO | German |
| THIS SCENARIO IS BEST PLAYED AS… | SIDE ONE VS AI |
Michael Dorosh

I’ve started playing this one H2H against Bill from the FGM. I’m the defenders.
Interested to see how this plays out, will look forward to hearing. Thanks for trying it.
Very interesting scenario. Won a major victory as Allies vs. Axis playing on Iron mode.
I did a left flank with one platoon that did NOT go through the ambush on the far right canal crossing but rather the unguarded crossing (luckily). I did not even find out about that ambush until the game was over. This flank caught the big mortars exposed and although it was a solid fight and I took losses was able to rout out the mortars and the surrounding security personnel. I was not expecting that, and I am glad I did not have any of those mortars dropping on my canal teams. I had two breach teams/engineers with this team, and they took the hilltop bunkers from the rear. I eventually sent the Bren carrier on that same sweeping move to provide a little support when the fight got hairy. This movement and fight took from 2:00 to about 1:00.
Right at the time that this was going on, I assaulted at the main canal crossing. I had snuck a whole platoon to the right of the road and snuck in the open up to about 100 m of the destroyed bridge. Jerry was sleeping and never saw me I guess. I did prep bombardment with half of my 88 mm load out on the units on the RIGHT of the canal crossing (HQ, HMG, AT). I avoided the bunkers on my side of the canal to the left of the road all together. I just left them alone until everyone else was dead! The prep fire ended at about 1:20 and then I assaulted with a second platoon. The bunkers could not provide any cover, since they are facing the wrong way. This was over about the same time as the bunkers on the hill were dispatched. At about 1:15-1:00 I launched my third platoon at the bunkers on my side, by using the rest of my 88 arty to soften them up, sticking close to the canal, heavy Bren covering fire and getting breach teams behind the bunkers. That did it.
I was almost completely back across the river due to your briefing warning when I saw the reinforcements coming. I did have to “quick” all the rest of my units to get safely back across. I basically set up a platoon or so of defense in the ruins of the axis abandoned bunkers, but this time pointing at Jerry’s side of the canal. The SS wave broke on me quickly and they ran like madmen into my guns. I knew they would not be able to cross the canal at the chokepoint, and they tried frontal assault after frontal assault and they died in waves against my very firm firing line on the canal banks.
The biggest flaw I found is that the Axis units are all on “hide” at the beginning and this allowed me to literally sneak up to them within spitting distance and then decimate them when I opened fire. I really don’t think they should be on hide. If they had actually contested my sneaking up to the river it would have been a big pain in the a**, but realistic. As it was, with their head down they could not see a thing I did, while my company HQ up on the second floor of a building could see everything they did. Also if the units up close are hiding they cannot spot and report back to the hill bunkers to provide covering fire. So those bunkers didn’t do anything either, since they couldn’t spot me. I spotted all their units quickly by sneaking bino units up into good OP’s, and he did not spot a thing. Even the bunkers on my side of the canal, I “quicked” and “hid” in the tall grass and fields (a bounding overwatch type of movement) and the bunkers and troops never fired a single shot, which I don’t think is what you intended. So I felt like I had an unfair advantage.
At the end the axis troops in ambush on my far left in the windmills never budged or fought and the two mortars at the rear of the board never fired a shot.
Fun scenario, neat idea, good map.
I liked it. Great job.
Not sure if I have a glitch in my system or what but Im playing this as the German defenders and I notice Im attacking a German AT gun that appears to be crewed by Germans. Yet they are highlighted in green signifying Allied soldiers. Have I missed something?
Hi Bootie,
No that is correct. The Canadians have a captured 75 mm AT gun and its ammo bearer crew. That is really handy, because that ammo crew also has a captured MG34 LMG that they can use to hit counter-attacking Germans! No spare ammo for that though.
In the Canadian briefing it says something like, “We captured a German AT gun in the village, so let’s give them a taste of their own medicine,” Or something like that.
I am sure it is the first time I have played as the Allies and had captured German kit.
So no, you didn’t miss anything.
Excellent… so I wasn’t seeing things… LOL
Thanks for the comments – great feedback. I’ll re-examine the scenario with the useful suggestions here.
Thanks again.
Is this a play-testing site? Some of the downloads seem playtested and others have oddities like the ‘hide’ set up?
No this is a site for playtested scenarios. The soon to be launched Proving Grounds II is for playtesting scenarios.
Is it true that this scenario doesn’t require Battlefront DLC? The screenshot looks like assets from Market Garden are in use.
I agree with you… I think it does require mods but will leave Michael to answer. 🙂
I didn’t know what DLC meant in the upload field. :blush:
I expect MG is indeed necessary as there is a windmill and thus Holland terrain.
Hi Michael
I played this one as the Germans and scored a tactical victory. It was an interesting enough battle from my perspective. My artillery stopped anyone attacking across the broken bridge and forced the enemy to attack down my right flank at the windmill river crossing. I seemed to have held him up enough there to give my reinforcements breathing space to set up a defence on the right of my bunkers. This ensured harassing fire on his forces moving in from the windmill area meaning they never had a chance to formulate a proper assault. He eventually ran out of time.
The map was interesting but with a little work could be awesome… I found the city area plain and a little work could be done in and around the houses to ensure it looked lived in and not just houses in an otherwise grassy area. The dykes etc give some good options for advance that was never really utilized by my opponent. All in all I enjoyed it though… good work.
Thanks for trying this out and the detailed comments. Yeah, I reach a point with maps where I get the basic gameplay stuff down and then I’m faced with being a landscape artist, which I need to do more work on… Always curious how my designs play H2H so glad to hear you had a chance to do this one.