Welcome to The Few Good Men

Thanks for visiting our club and having a look around, there is a lot to see. Why not consider becoming a member?

Monsaint Manor (Drifter Man vs Bulletpoint DAR)

1619 hrs, Turn 79. The Marder does not fire the third shot and the Firefly is allowed to withdraw, unharmed. I will not poke this bear anymore.

Some progress is achieved in Harfleur, where carrier scouts take a second building, eliminating one German and taking another one prisoner. However, I expect the next building to be strongly defended, and need to think about how to bring suppressive fire on it. In the south I continue pushing out the Germans at the last hedgerow before the river. The German Platoon HQ breaks and runs away, but a few infantry teams still show the will to fight. I am relieved to find a Panzerschreck among the dead - this one was hit by mortar fire. There should still be one schreck at large in the area, the one that escaped from Hill 312 about half an hour ago. Similarly, the two-man MG34 HMG team are survivors from Hill 312. You literally have to kill these MG's to the last man, otherwise they just set up the MG at the next hedgerow. There is another one-man survivor HMG team (I think) at Harfleur - and is giving me a lot of trouble by covering the central road from west to east.
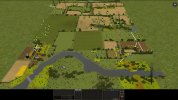
079_River.jpg
 
@Lethaface When it comes to Panzerschreck survival, I'd argue there are some religious, or maybe occult practices involved. But with these two Marders I think it is just my underestimation of their capabilities. As long as they were in open terrain and at medium ranges up to 600 meters, I could spot them and eliminate them by concentrating firepower from tanks and mortars. I did not realize that the same may not work for a Marder behind bocage (Marder 4 at 700-900 meters, killed 1 Sherman) and especially Marder in the open at long range (Marder 5 at 1000-1300 meters, killed 2 Shermans and disabled a third). I am pretty sure he is just looking for a good spot for Marder 4 behind bocage, while Marder 5 has not moved at all. Marder 5 has been firing for several turns and only now some infantry has spotted it. No tank has ever spotted any of the two as a solid contact - not before they died.

Anyway, my mistake was that I underestimated especially Marder 5 - it is protected by its invisibility in its current position. I did not have to take on it, but I was confident I could and that it would both improve my score and remove one potential adversary. So very good point about evading his defenses. While Marder 4 needs to go before I can take some objectives (certainly Bridge), Marder 5 is essentially harmless. I did not have to attack it. I was just too confident it will be easy with my superior numbers.

About the direction of the attack - I am moving in bounds, usually leaping forward on one flank, then catching up on the other, depending on the situation in front of me. Right now it seems I can take the Crossing (ford) where the Marders can't see and I can even deploy armor in support. I expect that Harfleur will see some heavy infantry fighting - I have plenty of firepower but can't deploy it against a village that is oriented from east to west, and it is a dangerous country for tanks due to panzerschrecks and Marders. If I succeed at the Crossing, I could continue to the north from there and take the Bridge from the south, instead from the east (from Harfleur). But these plans can change every minute.

Ok, all clear!
With regards to the direction of the attack/bounding forward: just thought you could (for example) bypass the bridge objective and all the defenses around there (only contesting hallefleur). Of course the wisdom of such a decision is decided by many factors.
 
Ok, all clear!
With regards to the direction of the attack/bounding forward: just thought you could (for example) bypass the bridge objective and all the defenses around there (only contesting hallefleur). Of course the wisdom of such a decision is decided by many factors.

In principle yes - the Crossing seems to be within reach, while the battle for Harfleur will likely be protracted and costly. But the next objectives are too far away (it is basically as far from the river to Three Intersections as it has been from Farine to the river), so I can't reach them in time and therefore bypassing Harfleur and the Bridge would not land me enough points for a victory.

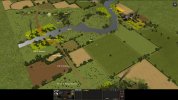
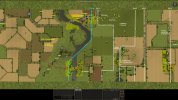
Some more comments on the two objectives are in the images below. Crossing should be easy. Harfleur is full of MP40s and will be hard. Bridge is covered by Marder 4 and will also be hard. I may try to get Crossing first and then attack Bridge from the other side of the river, but there will be about a company of Panzergrenadiers defending the space between the river and Three Intersections, and I wouldn't want to operate there with them in my flank...

079_ObjSouth.jpg
079_ObjNorth.jpg
 
1620 hrs, Turn 80. Not much to report this time as I am consolidating before continuing the attack at the Crossing. Marder 5 does not move but again vanishes from view. Before that I take a picture of it, surrounded by craters from area firing. Maybe I was just a bit short of luck here.

080_Marder5.jpg
 
Some more comments on the two objectives are in the images below. Crossing should be easy. Harfleur is full of MP40s and will be hard. Bridge is covered by Marder 4 and will also be hard. I may try to get Crossing first and then attack Bridge from the other side of the river, but there will be about a company of Panzergrenadiers defending the space between the river and Three Intersections, and I wouldn't want to operate there with them in my flank...
Lure them out in a firefight while having directfire mortars/tanks/the kitchensink ready to shell them to hell :)

Perhaps a bit of a rosy picture, such occasions are the perfect use for mortars or artillery. If you know when and where the firefight will take place and where his troops will defend from, the enemy has to choose between continuing the firefight while under a barrage; hiding in place and thus giving up on the firefight OR retreating under artillery fire and while in a firefight. I'm getting carried away a bit, but with the hill you could have opportunity to prepare a sort of counter ambush presenting your 'vulnerable flank' ;-).

1620 hrs, Turn 80. Not much to report this time as I am consolidating before continuing the attack at the Crossing. Marder 5 does not move but again vanishes from view. Before that I take a picture of it, surrounded by craters from area firing. Maybe I was just a bit short of luck here.

View attachment 21574

That does indeed seem unlucky. Tbh I have never had 'great succes' ko'ing vehicles with mortars / artillery independently. Having accurate mortar fire around enemy AFVs while you are engaging them with your own AFVs, is very helpful because it forces them to button up and you might have a lucky shot. But apart from that I try to not order fire missions on AFVs by itself, apart perhaps from precision strikes in modern CMx2.

Most importantly: keep it up! Great DAR to follow, thanks for the effort :)
 
Lure them out in a firefight while having directfire mortars/tanks/the kitchensink ready to shell them to hell :)

Perhaps a bit of a rosy picture, such occasions are the perfect use for mortars or artillery. If you know when and where the firefight will take place and where his troops will defend from, the enemy has to choose between continuing the firefight while under a barrage; hiding in place and thus giving up on the firefight OR retreating under artillery fire and while in a firefight. I'm getting carried away a bit, but with the hill you could have opportunity to prepare a sort of counter ambush presenting your 'vulnerable flank' ;-).


That does indeed seem unlucky. Tbh I have never had 'great succes' ko'ing vehicles with mortars / artillery independently. Having accurate mortar fire around enemy AFVs while you are engaging them with your own AFVs, is very helpful because it forces them to button up and you might have a lucky shot. But apart from that I try to not order fire missions on AFVs by itself, apart perhaps from precision strikes in modern CMx2.

Most importantly: keep it up! Great DAR to follow, thanks for the effort :)

I agree that ko'ing vehicles with artillery has a low chance of success (but it happens: recently I lost a StuG to an 155mm airburst). But the craters you see there are from a Firefly tank area firing an action tile in front of the Marder - the Firefly only had a reverse slope LOS on the Marder, but it had a blue line LOS on the action tile about 20 meters ahead of it. A shot that is just a bit too long and aimed in the right direction has a good chance if taking out a Marder. It just didn't happen. And after the Firefly got hit in the upper hull plate, it stopped firing... ignoring the fact that in the absence of a solid contact this is their best chance to win. Whereas a few minutes ago, another Sherman with an area fire order on German infantry got solid contact on a Marder during the turn but refused to switch target until explicitly told to. Oh well...

I think that what you suggest for the other side of the river could work - I could advance north along the Bulletpoint Ridge while covering the flank with mortars. I want to deploy those mortars on the Hill, but right now it is still too hot for them to be there. However, Bulletpoint knows very well where mortars can see from the Hill: he is very good at finding blind spots, and he'll be waiting for me in one :)
 
1621 hrs, Turn 81. The Marder has moved - to a new, more exposed position, from which it can fire on the top of Hill 312. I think this move is in support of a flanking attempt by the remaining German forces at the Crossing: While the Marder can suppress my cover position on the hilltop, the remaining German infantry (including one MG42) could on the right flank of my force advancing towards the Crossing.

081_Marders.jpg
081_Crossing.jpg

In response, I withdraw all infantry from the hilltop (I don't want them to get shot up by HE), reposition the advancing infantry in the bocage so they are less vulnerable, and area fire the expected position of the Germans with a Humber IV from the hilltop. I will also move the Firefly forward once again to poke the bear and try to catch him with area fire :) I hope the chances are better this time because the Firefly should be well concealed by trees.

081_Humber.jpg
 
1622 hrs, Turn 82. The expected flanking attack at the Crossing does not materialize - the two soldiers I spotted were just looking for better cover, and the fact that I withdrew my covering force just allowed them to do that safely. That's fine, I'll deal with them soon. Marder 5 does not area fire. My opponent perhaps just wanted a new, higher position for the beast. And it looks like it was its undoing... this time two HE shells from the Firefly land really close, and although the Marder shows as active at the end of the turn, there is no crew in the compartment. Something tells me that Marder with no crew is a good thing. For me, I mean.
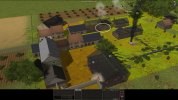
082_Marder5.jpg

Meanwhile at the Crossing I send two volunteers to claim the objective, while another scout team emerges on the western side of the hedgerow and gets under fire from a new HMG42 on the Bulletpoint Ridge. It is reasonable to expect that Bulletpoint wants to secure the Crossing with MG's, but they will be very vulnerable to tank and mortar fire there.

EDIT: I can also hear a MG34 firing from a position next to the new HMG42... this is the ninth HMG team I've registered, indicating that my opponent probably kept all HMGs of the battalion (twelve).

082_Crossing.jpg
 
Last edited:
1623 hrs, Turn 83. A bunch of good news - sort of. Marder 5, my nemesis, is confirmed as Knocked Out by near misses by 76.2mm HE from the Firefly. Marder 4, my other Nemesis, relocates to a new position not far from Marder 5 - apparently Bulletpoint could not find a satisfactory position covering the Bridge, so he settled down on a new one from which he can see the road down from Hill 312 to the Crossing at about 950 meters, but cannot do much around Harfleur. This move happened under the presumably watchful eyes of the 10 Troop commander, who observed the Marder's exit area from his Firefly. At this distance (1250 meters) even a moving Marder is hard to see.

083_Marder.jpg

At Harfleur I send two brave volunteers to a suicide assault. They go out with guns blazing, taking down at least one German with them, but most importantly they give me information about enemy strength and location. As expected, Bulletpoint put his strongest force into the rearmost buildings that cannot be area fired, so you just have to walk up there and politely knock on the door. But I have a plan to take on these Germans from the other side as well, where I can have some support from Hill 312. But first I have to clean up the Hill - there still is a sniper covering the southern approach to Harfleur. This is why I haven't done this earlier.

083_Harfleur.jpg

And the said clean-up is progressing well, too... a two-man scout team hits the building by the roadside, the last German stronghold at the Hill, and takes out a Panzerschreck, plus forces a HMG team to surrender. Forces remaining: sniper, two-man HMG team, probably two rifles, and a one guy from a Platoon HQ.

083_Hill312.jpg
 
Nice job on that nemesis. With only one (?) Marder remaining, your remaining tanks and AC's gain. This time the CM gods have blessed your cause, so it seems. ;-)
 
Nice job on that nemesis. With only one (?) Marder remaining, your remaining tanks and AC's gain. This time the CM gods have blessed your cause, so it seems. ;-)

I probably appeased them with this test of how many Marders can a 17-pounder kill with one shot:

CM Normandy 2020-11-20 15-41-55-22.jpg

It's also good to see that god Bren is more powerful than Schregg, although for this battle I could use favors from the entire CM pantheron.
 
1624 hrs, Turn 84. The defense of the western slope of Hill 312 is now completely breaking down. The house by the road - a rather dilapidated structure with foliage growing through the walls - is full of surrendering Germans, but I need to get someone over there to actually take the prisoners. At the same time, I am starting to shell MG positions on the other bank of the river.

084_Hill312.jpg

Crews of the armored cars have an annoying habit of opening the hatches when there has been no action for some time - either that or I give the order by mistake, but I don't think I do that. I'll have to keep checking every vehicle at the start of the turn. This time a makeshift crew of a Humber III armored car pays the price for being too curious. One man picked off with a short burst of a HMG from across the map.

084_Humber.jpg
 
1625 hrs, Turn 85. Not a great turn - I lose two men to long range HMG fire. A HMG in Harfleur took out the Humber III crewman in the previous turn and now added another man from a rifle section. This HMG is one of the most annoying units Bulletpoint has got: they have taken heavy losses but one or two last men (I think) eventually set up in a well covered building on the second floor and have caused numerous casualties. I tried to hit them with area fire from a Humber IV but all I could hit was a tree. I do land some nice 75mm hits on a building in Harfleur though, where a PzG team has been spotted.

A sniper is again heard. I've never had a contact, solid or tentative, on this sniper, which competes with the HMG above in terms of annoyance rating. I know where he is, but have no way to hit him until I will be on top of him. This guy covers the southern access to Harfleur and has also scored quite a few kills (five, by my estimate)

It seems Bulletpoint lined up the river with MG nests and just the sheer number of them means I will be stuck there for a while, taking them out.

085_Overview.jpg
 
1626 hrs, Turn 86. A carrier section pushes towards the Crossing and I am sending a volunteer to probe across the river. On Hill 312 I am deploying mortars - carefully, in wide spacings - to support the next move. At Harfleur I am trying to keep the annoying MG suppressed while moving the 6 Platoon forward. In the back I make a strategic decision to move the reserve 5 Platoon to the northern side (Harfleur). Bulletpoint still has an intact Panzergrenadier company on the other side of the river, a formidable force even without heavy weapons, and he may use it for a counterattack to keep either Bridge or the Crossing under his control. I conclude this is much more likely to happen at Bridge/Harfleur, where the terrain provides better cover on the German side and where more points are at stake (he could even contest Harfleur if successful - not that I have taken Harfleur yet but I am confident I will take it in a not too distant future). Therefore, 5 Platoon will be ready there to back up 6 Platoon if necessary.

086_Overview.jpg
 
1627 hrs, Turn 87. First man across the river. German MGs are not very active - part suppressed, part not having good view, I believe. I find a second Panzerschreck team on the other bank. The German sniper continues to add to his kill count, generally one kill per turn. I still have no solution for him, nothing that can spot the sniper or the position on which he is sitting can succeed: vehicles have no target, mortars are not accurate enough and infantry dies. Basically my entire advance for the last 40 minutes or so has evolved around this sniper, camped in a perfect position in the center of the map.

1628 hrs, Turn 88. Sometimes there is not that much to report, so I choose this shorthand form without screenshots. At the Crossing I eliminate a Panzerschreck team plus a HMG team that ran into the water in panic, while at Harfleur I am sending a rifle team to scout across the southern part of the village - this time covered with smoke and some MG fire. I am also tightening the noose around the sniper and shelling him with 2in mortar. Two turns to get him, maybe three? The Marder moved its gun, pointing it at Hill 312. Possibly a target arc, but more likely my opponent wanted to area fire and this did not work because of obscured line of fire.

Edit: I think I can spare a screenshot... showing some movements around the Crossing. Scouts from the Carrier Platoon + one survivor from 1 Troop lead the way, followed by a rifle section from 4 Platoon, a second section as backup and a third one further in the rear ready to follow. Not much German activity here, or anywhere, at this time.

088_Overview.jpg

1629 hrs, Turn 89. Another "nothing to report" turn, German lines are quiet and I only have few contacts. I am moving more men forward across the river. One Sherman is down to 300 rounds of MG ammo.
 
Last edited:
1630 hrs, Turn 90. While moving more men across the river, I dispatched one scout team to attack the sniper from behind. This is the only way - on a reverse slope, behind low hedge and hidden among trees, he cannot be approached or even properly spotted from the front. It still takes them almost one minute to take him down, because most of their fire is blocked by those shrubs.

090_Sniper.jpg

Killing the sniper feels like a thorn was removed from my side. Bulletpoint taught me a lesson with this sniper - in suitable terrain a lone sniper can hold off your entire force for a long time. This one recorded 7 kills (if I observed correctly), which is not a great kill count, but that's because I avoided him most of the time, channelling my troops away from him towards the edges of the map.

At Harfleur I send two men to rush a building in the south of the village. They take a German mortar team of 4 men by surprise, wiping out three with Bren and a grenade. The fourth one is murdered in cold blood with a .38 to the head.

090_executioner.jpg

In addition, they discover bodies of 6 Germans I didn't know about (but suspected), hit earlier by tank fire. I also confirm that a Panzerschreck, taken down earlier by scouts, has been recovered by another German soldier (I also suspected that). Overall situation in Harfleur is crowded, with opposing soldiers sometimes meters away from each other without knowing:

090_Harfleur.jpg

Situation update, 1630 hrs. 90 minutes have passed, 3/4 of the time allocated for my mission. I have advanced up to 1050 meters from the start line, took the Crossing and made some progress at Harfleur by claiming a few buildings - Bulletpoint still holds the western part of the village. German activity has been low for the last 10 minutes or so, Bulletpoint's forces are now waiting behind the ridge that dominates the river, covered by his last Marder. In the 30 minutes that remain, my task is to take Harfleur completely and secure both the Crossing and the Bridge, ensuring that Bulletpoint cannot take them with a last minute counterattack. The best way to do it seems to be to stay on the offensive until the end, even though I don't want to take any more objectives.

My opponent should have one Panzergrenadier company with a few HMGs and a Marder on the west bank of the river. On the east bank, some forces - a mixed bag of panzergrenadier infantry and heavy weapons crews - remain to be cleared from Harfleur. The defenders have taken at least 164 casualties.

My side has lost 94 men, 5 tanks and 7 armored cars. One tank has its main gun disabled, so I am left with three 75mm Shermans (one of which is low on ammo) and two Fireflies (one is out of HE ammo). I have 75 mortar rounds left - 84% have been spent. I estimate the current score as 430:484 for Bulletpoint (150 for objectives + 280 for casualties for me, 300+184 for Bulletpoint). I need the Bridge to claim victory. And I need to avoid messing up, such as by losing more tanks.

090_Overview.jpg
 
1631 hrs, Turn 91. I keep advancing against weak resistance. One HMG at the Crossing is confirmed as Knocked Out - I think maybe two more HMGs have been similarly knocked out by tank fire. A schreck retreats from Harfleur under heavy fire - protected by the blessings of Schregg, he survives and finds shelter in a building close to the river.

After I get some more troops across the river, I plan to deploy them on the eastern slope of Bulletpoint Ridge. I don't want to go up the ridge and see what is there (crossed out in the screenshot), because I know what is there - a Panzergrenadier company. I don't want to fight it when I am outnumbered or without support. I am concerned Bulletpoint could counterattack while I am still weak at the river. I will wait until I have more forces across and spread out along the ridge, and until the situation at Harfleur is under my control, so that I can provide help from that side.

091_Crossing.jpg
 
1632 hrs, Turn 32. The fighting in Harfleur continues. A third mortar team of three is eliminated - I think. This leaves about a squad of infantry, ATG crew, 3 ammo bearer teams, one or two HQ's, a Panzerschreck, and a depleted HMG team... plenty to go. And while at the Crossing my opponent is retreating from the reach of tank fire and mortars, I now have infantry contacts across the Bridge: a MG42 soldier behind bocage and a rifle moving in from the rear. As expected, Bulletpoint wants to make a stand at the Bridge. Will I be able to break through before time runs out?

092_Overview.jpg
 
Back
Top